Crochet dragonfly granny square pattern for summer blankets
Free crochet dragonfly granny square pattern with a slim body, four appliqué wings and French knot eyes. Beginner-friendly 3-inch summer motif
About this pattern
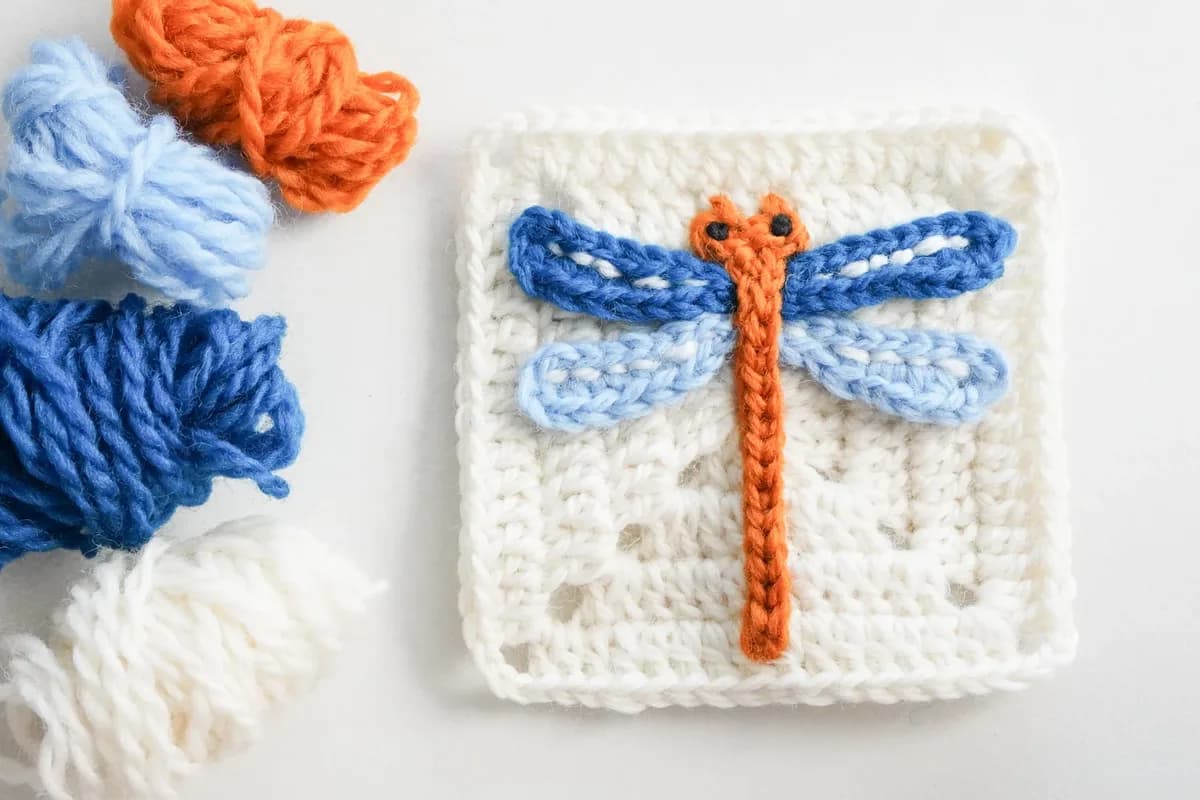
This pattern turns a plain three-round solid granny square into a little summer meadow scene with a dragonfly resting right in the middle. The dragonfly is built from five separate appliqué pieces — one slim body with a rounded head, two right wings and two left wings — that get stitched onto the finished square. It is perfect for anyone who loves granny squares but wants something with more personality than stripes, and for crocheters who enjoy assembling small pieces into one satisfying whole
Everything here is built from chains worked back along themselves. You chain, turn, and slip stitch through the back loops to create the long tapered body, then rotate and work down the front loops of the wings with a gentle progression of slip stitches, single crochet and half double crochet that gives each wing its curved edge. The background is a straightforward three-round solid square. Nothing more advanced than a half double crochet appears anywhere, so a confident beginner can finish the whole thing in an evening
The finished square measures roughly 3.1 inches by 3.1 inches, small enough to multiply quickly into a blanket and large enough that the dragonfly reads clearly from across a room. The appliqué construction gives it real dimension — the wings sit slightly proud of the background, catching light and shadow as the fabric moves. Made in five colors it becomes a genuinely charming handmade gift, whether it goes into a summer throw, a tote bag panel, or a single framed square for a nursery wall
Variations
Idea 1
I have a soft spot for patterns that look far more complicated than they actually are, and this one is my favorite kind of trick. The whole dragonfly is just chains worked back on themselves — you chain eighteen, turn around, and slip stitch your way home through the back loops, and suddenly you are holding a slim little body. Then those two tiny arched shapes at the top form the head, and I genuinely grinned the first time one appeared under my hook. The wings are where it gets clever: working slip stitches into hdc along the front loops creates a natural curve, so the wings taper and lift without any shaping math. My favorite moment is assembly. You lay the body vertically down the center, arrange four wings near the head until the angles look right, then stitch one line straight across each wing — and that single line becomes the wing vein. Two French knots for eyes, and the thing comes alive. It is small, it is fast, and it makes people ask how on earth you did it
Common mistakes
Working into both loops instead of only
The back-loop-only return is what makes the body slim and gives it that raised ridge. If you catch both loops, the piece will be wider, flatter, and it will curl awkwardly. Tilt the chain toward you so the back loop sits clearly on top, and insert your hook under that single strand only. Slow down for the first three stitches until your eye learns the rhythm
Making four identical wings instead of
The right and left wings are genuinely different — the right wing chains 10 and works 9 slip stitches on the back loops, while the left wing chains 11, skips 4, and works only 7 stitches with the shaping reversed. Make both right wings first, set them aside in a pair, then make both left wings. Lay them out mirrored before you sew anything down
Forgetting to rotate the wing piece
After the first pass of slip stitches you must physically turn the piece around so you are working back along the opposite side of the same foundation chain, into the front loops. Skipping this rotation gives you a straight strip instead of a wing with a curved outer edge. Rotate the work like turning a page, keeping the same face toward you
Stitching the dragonfly body on crooked or off-center
Place the body vertically with the head pointing to the top of the square and pin or hold it in position before making a single stitch. Check that the distance from the body to the left and right edges matches, and that the head sits well inside the top round rather than crowding the border. A single pin at the head and one at the tail keeps it honest while you sew
Sewing the wings down only at the base
The assembly calls for a stitched line straight across the center of each wing. That line does double duty — it anchors the wing flat and creates the vein detail that makes it read as a dragonfly wing. Use a single strand of matching yarn and run a neat line from the inner edge to the outer tip of each wing
Making the French knot eyes too large
The head is tiny, so two or three wraps around the needle is plenty. More than that and the knots dominate the whole face. Work them close together near the top of the head, pull the yarn through slowly while holding the wraps snug against the fabric, and secure the tail on the back before trimming
Materials & abbreviations
Materials
- Yarn of your choice- 5 colors; the sample is made with DK Sports. The finished granny square is about 3.1 inches by 3.1 inches.
- Crochet hook- we are using a 3.00mm hook
- Darning Needle
- Scissors
Abbreviations
- ch
- chain stitch
- sc
- single crochet
- hdc
- half double crochet
- dc
- double crochet
- rep
- repeat
- st
- stitch
- sk
- skip
- slst / sl st
- slip stitch for joining different rounds
- yo
- yarn over
- FL
- front loop
- BL
- back loop
Main pattern
Body — Round 1
Knot on the hook, ch18. Return, sk1, BL of next 17 ch (from 17th to 1st): 17slst. Still work in the BL of 1st ch: [(ch2, return, sk1, BL of the 1st st: 1sc). slst. (ch2, return, sk1, BL of the 1st ch: 1sc). slst]. Fasten off.
Tip We begin by chaining and working back to create the slim dragonfly body. Then we stitch two small arched shapes at the top to form the head.
Body — Additional guidance
Make a knot on the hook and chain 18; return along the chain, skip 1, and work 17 slip stitches into the back loops of the next 17 chains (from the 17th back to the 1st). Then, still working into the back loop of that 1st chain, make the two little arched shapes for the head: chain 2, return, skip 1, work 1 single crochet into the back loop of the 1st stitch, slip stitch; then chain 2 again, return, skip 1, work 1 single crochet into the back loop of the 1st chain, slip stitch. Fasten off. The sample body is worked in bright orange.
Right Wing — Round 1
Knot on the hook, ch10. Return, sk1, BL of next 9 ch (from 9th to 1st): 9slst. Then rotate your piece to work on the opposite side of the foundation chain. FL of the 9 ch (from 1st to 9th): 2slst, 3sc, 2hdc, ch2, sk2. slst to the 10th ch (FL), fasten off.
Tip Just like real dragonflies, ours will have two pairs of wings. In this part, we'll create both the left and right wing appliqués.
Right Wing — Additional guidance
Follow the steps in the pattern and choose colors that match your dragonfly design. Remember to make two of each wing — two left wings and two right wings! The sample uses shades of light and dark blue for the wings.
Right Wing — Additional guidance
Make two right wings.
Right Wing — Additional guidance
Knot on the hook and chain 10; return, skip 1, and work 9 slip stitches into the back loops of the next 9 chains (from the 9th back to the 1st). Then rotate your piece to work on the opposite side of the foundation chain. Working into the front loops of the 9 chains (from the 1st to the 9th), work 2 slip stitches, 3 single crochet, 2 half double crochet, chain 2, skip 2, then slip stitch into the front loop of the 10th chain and fasten off.
Left Wing — Round 1
Knot on the hook, ch11. Return, sk4, BL of next 7ch (from 7th to 1st): 2hdc, 3sc, 2slst. Then rotate your piece to work on the opposite side of the foundation chain. FL of the 9ch (from 1st to 9th): 9slst. Fasten off.
Tip Make two left wings.
Left Wing — Additional guidance
Knot on the hook and chain 11; return, skip 4, and work back into the back loops of the next 7 chains (from the 7th to the 1st) as follows: 2 half double crochet, 3 single crochet, 2 slip stitches. Then rotate your piece to work on the opposite side of the foundation chain and work 9 slip stitches into the front loops of the 9 chains (from the 1st to the 9th). Fasten off. Note the shaping is the mirror image of the right wing.
Background - Solid Granny Square — Round 1
Start with a magic loop. ch3 as a standing st(count as 1dc). 3dc, ch3. *(4dc, ch3) * rep 3 times omitting final ch3, ch1, 1hdc connects back to your starting ch3.
Tip Let's crochet a solid granny square as the background for your dragonfly.
Background - Solid Granny Square — Round 2-3
ch3(counts as dc), 1dc in this corner. (2dc+ch3+2dc) in remaining corners. 1dc in remaining sts. 2dc in the start corner. ch1, 1hdc connect back to the first ch3.
Background - Solid Granny Square — Round 4
ch3 as a standing st(count as 1dc), 1dc in this corner sp. (2dc+ch3+2dc) in remaining corners. 1dc in remaining sts. 2dc in the starting corner, ch3, sl st to the true dc after first ch3, fasten off.
Important notes
The finished square measures approximately 3.1 inches by 3.1 inches when worked in DK sports weight yarn with a 3.00mm hook. If you are making a blanket, crochet one full square first and measure it before committing to a hook size — everything else in the project depends on that number staying consistent
Weave in the ends on the background square before you attach any appliqué pieces. Once the dragonfly is stitched down, the back of the square becomes crowded with sewing tails and it is much harder to bury a yarn end neatly without distorting the front
Leave a generous sewing tail — about eight to ten inches — when fastening off each appliqué piece. You will use that same tail to sew the piece onto the square, which means no extra joins and no extra ends to hide
Block the background square lightly before assembly. A flat, square background makes it far easier to judge the placement of the body and the four wings, and a squared-up edge is essential if you plan to join multiple squares later
Use a smooth yarn with good stitch definition for the wings. Fuzzy or heavily textured yarn hides the slip stitch to single crochet to half double crochet progression that creates the wing shape, and the vein line will disappear into the fluff
Keep your slip stitches loose. Slip stitch fabric tightens easily, and both the body and the wings are built almost entirely from them — a tight tension will make the pieces curl and shorten rather than lie flat against the square
The finished granny square is about 3.1 inches by 3.1 inches
You'll create the long body and four wings by working back along foundation chains, then sew them onto a solid square for a bold 3D effect
Try it in orange or red to capture that summer memory. These squares are perfect for blankets or summer bags
Sample colorway: the dragonfly features a bright orange body and delicate wings in shades of light and dark blue
Frequently asked questions
Not at all — five is simply what gives the most contrast between the background, the body, and the wings. You can work the whole dragonfly in one color against a contrasting background, or use just three: one for the square, one for the body, and one for all four wings. The design still reads clearly as long as the dragonfly contrasts with the background behind it
That is exactly right. The body is made by chaining and then slip stitching back through the back loops only, which produces a narrow, slightly ridged cord rather than a flat panel. Dragonflies have long slender bodies, so this construction is intentional. The two small arched shapes worked at the end are what widen the top into the head
The stitched line across the center of each wing is your main anchor, so make sure it runs the full width from the inner edge to the tip. If a project will get heavy use, add a few discreet tacking stitches near the outer wing tips in matching yarn. They will be invisible from the front and will keep everything flat through washing
They are a lovely size for a tote bag panel, a set of coasters, or a cushion front made from nine squares joined three by three. A single square also works beautifully as a pocket patch on a plain cardigan or as a framed piece for a child's room. The appliqué dragonfly itself can be stitched onto almost any finished crochet fabric