Dragon Granny Square: Free Crochet Pattern with Horns and Ears
Crochet a dragon granny square with horns, ears and a bobble snout — a free 3.5-inch DK pattern with picot crest, magic ring and full stitch guide
About this pattern
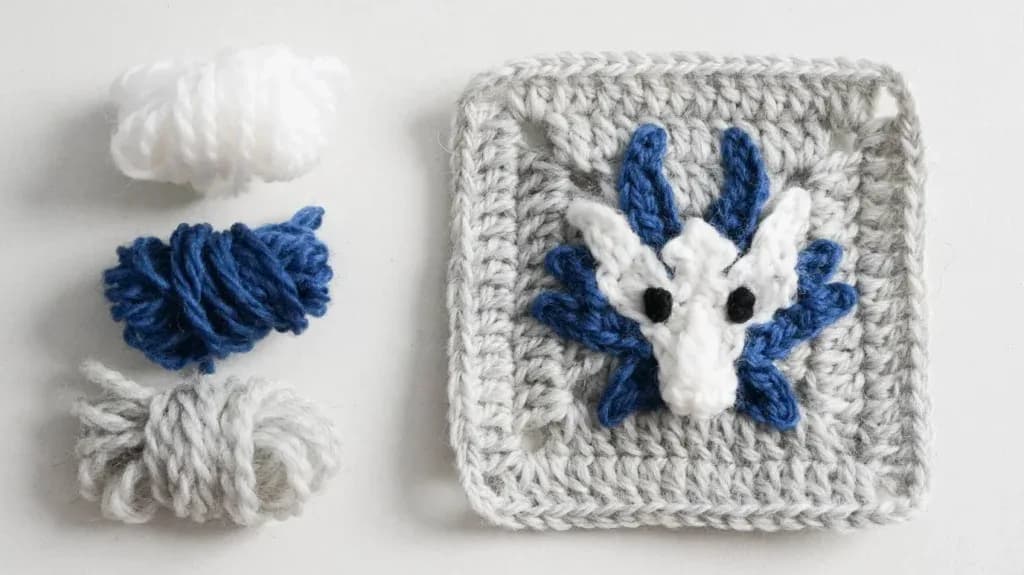
This pattern turns a plain granny square into a tiny dragon portrait. It features a 3D dragon head with long horns and flowing whiskers. You start with a magic ring and five single crochet, grow the head through paired increases, drop in a 2-dc bobble for the puffy nose, then build a picot crest, two ears and two horns that sweep back from the head. The finished motif is a flat 3.54-inch square worked in four colors, so it slots straight into any granny-square blanket, tote panel or patchwork cushion you already have in progress
The technique list is a nice intermediate stretch: magic ring, single crochet increases, half double crochet, a 2-dc bobble worked over three skipped stitches, sc2tog, chain-1 picots, and horns, ears and whiskers built by chaining then working back along the back loops of that chain. Nothing is difficult in isolation, but the turning rows and the exact anchor points for each horn demand attention. Budget two to three hours the first time, and closer to ninety minutes once the horn placement clicks
Off the hook you get a crisp 3.54 in by 3.54 in square in DK on a 3.00mm hook — dense enough to hold the horns upright, light enough to join without bulk. The bobble nose sits proud of the fabric, the picot crest reads as a row of tiny spikes, and the ears tuck neatly in front of the horns. The dragon face is worked as an appliqué and sewn onto a solid granny square background, so you can make one as a pocket patch, nine for a nursery blanket, or a whole hoard in different colorways for a dragon-obsessed kid's quilt
Variations
Idea 1
Color is where this square gets addictive. The classic combo is a sage or forest green head, cream horns and ears, a gold bobble nose and a rust picot crest — very storybook dragon. For an ice dragon, go icy blue head, white horns, silver-grey crest and a pale pink snout. For a lava dragon, flip it: charcoal head, bright orange crest picots, and a red bobble. Because the pattern already calls for four colors, you can also make one horn pair contrast with the other for a mismatched, mischievous look. Size changes are straightforward. Work the whole square in worsted on a 4.00mm hook and it grows to roughly 4.5 inches; drop to fingering on a 2.50mm hook and you get a 2.5-inch mini dragon perfect for a bookmark topper or brooch. To make the horns bigger without redrawing anything, chain 10 instead of 8 and work back with 2slst, sk1, 6sc — the extra two chains add length without changing the anchor stitches. For a hornless baby dragon, skip the two ch-8 horn sections entirely and just leave the picot crest and ears. Yarn-wise, Paintbox Simply DK and Scheepjes Catona (held for a slightly denser square) both hold the horn shape well; avoid anything with a heavy halo, since mohair blurs the picots. Nine squares joined 3x3 makes a cushion cover; twenty-five makes a toddler blanket that kids will genuinely fight over
Idea 2
I have made a lot of granny squares, and this is the first one that made me laugh out loud when the face appeared. The moment that sells it for me is the 2-dc bobble: you skip three stitches, work the bobble, then go back and fill in those skipped stitches with half doubles — and suddenly there is a snout poking off the surface instead of a flat blob. It feels like sculpting rather than stitching. I also love how economical the crest is. Three chain-1 picots over a single sc2tog is all it takes to read as spiky dragon ridge, and the sc2tog then does double duty as the anchor point for both back horns. The horns themselves are my favorite trick in the whole pattern: chain 8, turn, and travel back along the back loops only with slip stitches and single crochet. The back-loop-only return is what gives them that curved, slightly twisted look instead of a flat spike, and the same chain-and-return trick builds the ears and the whiskers around the face. And because the whole thing finishes at 3.54 inches, you get all that character in one evening
Common mistakes
Leaving the magic ring loose after the first round of 5 sc
The instruction to pull the tail tightly is not optional here — this is a face, and a gappy center shows as a hole right between the eyes. Close the ring fully before you slip stitch to the first sc, then weave the tail in the opposite direction of the pull so it cannot slowly work loose. If your ring still relaxes over time, thread the tail through the ring stitches once more before weaving in
Working the 2-dc bobble into the
The sequence is: skip 3 stitches, make the 2-dc bobble, then go back to the first st you skipped and work 1 hdc, 1 hdc. Crocheters often place the bobble in the third skipped stitch by reflex, which flattens the snout and pulls the face crooked. Place a stitch marker in the stitch immediately before the skip so you know exactly where to return
Losing track of the sc2tog after turning the work
The sc2tog is the single most important landmark in this pattern — the picot crest sits on it, the left horn anchors to its back-side loop, and both leg stitches are referenced later. Put a locking stitch marker through the sc2tog the moment you make it and leave it there until both horns are attached. Do not remove it just because the crest is finished
Working the returns through both loops
The horns are built by chaining 8, skipping 1, then working 2slst, sk1, 4sc into the back loop (BL) of the chain, and the ears and whiskers use the same back-loop return. Going through both loops makes a stiff, flat spike that will not curve. The source is explicit about this: to preserve the face shape, avoid working in the front loops of the outer stitches and chains — work in the back loops or underneath loops instead
Starting both back horns from the same side of the sc2tog
The right horn starts in the stitch below the sc2tog's right leg; the left horn is joined to the back-side loop of the sc2tog itself and finishes in the stitch below the left leg. They are deliberately asymmetric in their anchor points so the horns end up symmetric on the finished square. Count the stitches out loud before joining each one, and check the head is right-side-facing before you start
Making the ears too tight so they stick straight out
Both ears use a ch-4, return, sk1, back-loop return over the next 3 chains. If your chains are tight, the ear buckles and will not lie against the head. Chain the ear loosely — one hook size larger for just the chain is fine — and after the final slip stitch, pin the ear flat and steam it lightly so it sits alongside the horns rather than in front of them
Spacing the whisker clusters unevenly along the edge
The whiskers on both sides of the face have to mirror each other, and the source gives the rule that keeps them balanced: after you finish each whisker appliqué, skip a distance along the outer edge that equals the width of that whisker's bottom before starting the next one. Eyeball it once and one side will end up crowded — measure the bottom of the cluster you just made and match the gap to it
Materials & abbreviations
Materials
- Yarn of your choice —4 colors; the sample is made with DK sports. The finished granny square is about 3.54 inches by 3.54 inches.
- Crochet hook- we are using a 3.00mm hook
- Darning Needle
- Scissors
Abbreviations
- ch
- chain stitch
- ch-sp
- chain space
- sc
- single crochet
- dc
- double crochet
- hdc
- half double crochet
- inc
- increase
- rep
- repeat
- st
- stitch
- slst / sl st
- slip stitch for joining different rounds
- sk
- skip
- yo
- yarn over
- bo
- bobble stitch
- pic
- picot stitch
- sc2tog
- single crochet 2 stitches together
- BL
- back loop
Main pattern
Crochet the Dragon Face — Round 1
Magic ring, ch1, 5sc, slst to the first sc, pull the tail tightly.
Tip How it comes together We will start by crocheting the face with a puffy nose. Next, add the ears, horns, and whiskers by making chains and working back along them. Finish the dragon by adding tiny eyes and sewing it onto a solid square.
Crochet the Dragon Face — Round 2
ch1 to start, (sc inc)×2, 3sc, slst.
Crochet the Dragon Face — Row 3
ch2(count as hdc), 1hdc. sk3, 2-dc-bo. back to the first st we sk: 1hdc, 1hdc.
Crochet the Dragon Face — Row 4
Turn over. ch1+1sc, 1sc, sk the bo, 2sc.
Crochet the Dragon Face — Row 5
Turn Over. ch3+hdc+ch2+slst in first st. slst to 2nd st. sc2tog over 2nd and 3rd st, ch1, (ch-1 pic)×3, slst in the TL of sc2tog, slst in the same st from the left of the sc2tog(slst in the 3rd st). slst+ch2+hdc+ch3 in 4th st, slst, fasten off.
- Right ear Join to the hdc on the right, ch4, return, sk1, BL of next 3 ch: slst, 2sc. slst to next ch-sp, fasten off.
Crochet the Dragon Face — Additional guidance
Two Ears The ears are made the same way as the horns and whiskers: chain out from the face, then crochet back along the chain to build the shape.
Crochet the Dragon Face — Additional guidance
Top Two Horns The ridge between the two ears is our dragon's crest, constructed from stitches with a sc2tog anchoring the bottom center. For an authentic dragon character, the horns stretch from the back of the head symmetrically. So pay careful attention to where each horn starts and ends!
Crochet the Dragon Face — Additional guidance
Whiskers Whiskers around the dragon's face. Here are the key tips to create the most charming dragon face!
The Background - Solid Granny Square — Round 1
Start with a magic loop. ch3 as a standing st(count as 1dc). 3dc, ch3. *(4dc, ch3) * rep 3 times omitting final ch3, ch1, 1hdc connects back to your starting ch3.
Tip Background Crochet a Solid Granny Square as a background for the dragon face appliqué.
The Background - Solid Granny Square — Round 2-3
ch3(counts as dc), 1dc in this corner. (2dc+ch3+2dc) in remaining corners. 1dc in remaining sts. 2dc in the start corner. ch1, 1hdc connect back to the first ch3.
The Background - Solid Granny Square — Round 4
ch3 as a standing st(count as 1dc), 1dc in this corner sp. (2dc+ch3+2dc) in remaining corners. 1dc in remaining sts. 2dc in the starting corner, ch3, sl st to the true dc after first ch3, fasten off.
- Assemble Sew this dragon appliqué to the center of the solid granny square. Now thread your matching yarn through the edge loops of both the appliqué and the base square, working in and out as you go. Pull each stitch snug so everything stays firmly in place.
The Background - Solid Granny Square — Additional guidance
Eyes And, make two French knots on either side of the center for eyes!
Important notes
The sample uses a 3.00mm hook with DK, and the finished square measures about 3.54 inches by 3.54 inches. That tightness is intentional: it keeps the bobble nose raised and stops the horns from flopping. If your square comes out floppy at 3.54 inches, go down to 2.75mm rather than changing the stitch counts
Use four locking stitch markers, not one. Mark the sc2tog, the hdc on the right where the right ear joins, the ch-2 on the left where the left ear joins, and the stitch below the sc2tog's right leg. Every later instruction refers back to one of these four points, and hunting for them mid-round is where most people go wrong
With four colors you will have a lot of ends. Join new yarn with the tail on the wrong side and weave in each color as soon as you finish it rather than saving them all for the end — once the horns and ears are attached, getting a darning needle behind the fabric becomes fiddly
The ch-3 at the end of the left horn is meant to hide under the left ear. Work it a little loosely and tuck it under the ear before slip stitching into the ear's bottom-center stitch; if you pull it tight, the ear lifts and the join becomes visible from the front
Count the turning chains carefully. In Row 3 the ch-2 counts as an hdc, and Rows 4 and 5 both begin by turning the work over — mixing those up shifts the whole face by one stitch and the horns will not line up symmetrically. Read each turning instruction before you work it, not after
Block gently with steam, not by soaking and pinning hard. Hard blocking flattens the bobble nose and the three picots of the crest, which are the two details doing all the visual work. Hover the iron above the square, press the flat background lightly with your fingers, and leave the raised parts alone
Frequently asked questions
No stuffing at all — this is a flat granny square, and the raised snout comes entirely from the 2-dc bobble worked over three skipped stitches. If it looks flat, your bobble is likely too loose; pull the closing loop firmly to push the bobble to the front of the fabric
Yes. Worsted on a 4.00mm hook produces a square around 4.5 inches instead of 3.54 inches, with slightly chunkier horns. Just make sure every square in your project uses the same yarn and hook, since mixing weights across a blanket makes joining a nightmare
The right horn returns with 2slst, sk1, 4sc and the left with 2slst, 5sc because they anchor at different points around the sc2tog. The uneven counts are what make the finished horns look mirrored on the front of the square, so resist the urge to even them up
3.54 inches per square, a 3x3 arrangement gives you a small cushion front, 5x5 makes a stroller blanket around 18 inches, and 8x10 gets you a toddler blanket. Add a couple of rounds of border in your main color to frame the dragon faces
The eyes go on last, after the dragon face is sewn to the solid granny square: make two French knots on either side of the center. If you would rather not embroider, small satin-stitch eyes in black work too, or safety eyes if the finished item is not for a baby