Little Navy Sailboat Granny Square — A Beginner-Friendly Applique
A beginner-friendly granny square with a little navy sailboat applique, worked in 5 rounds plus a border in cream, navy, and red — about 7x7 inches.
About this pattern
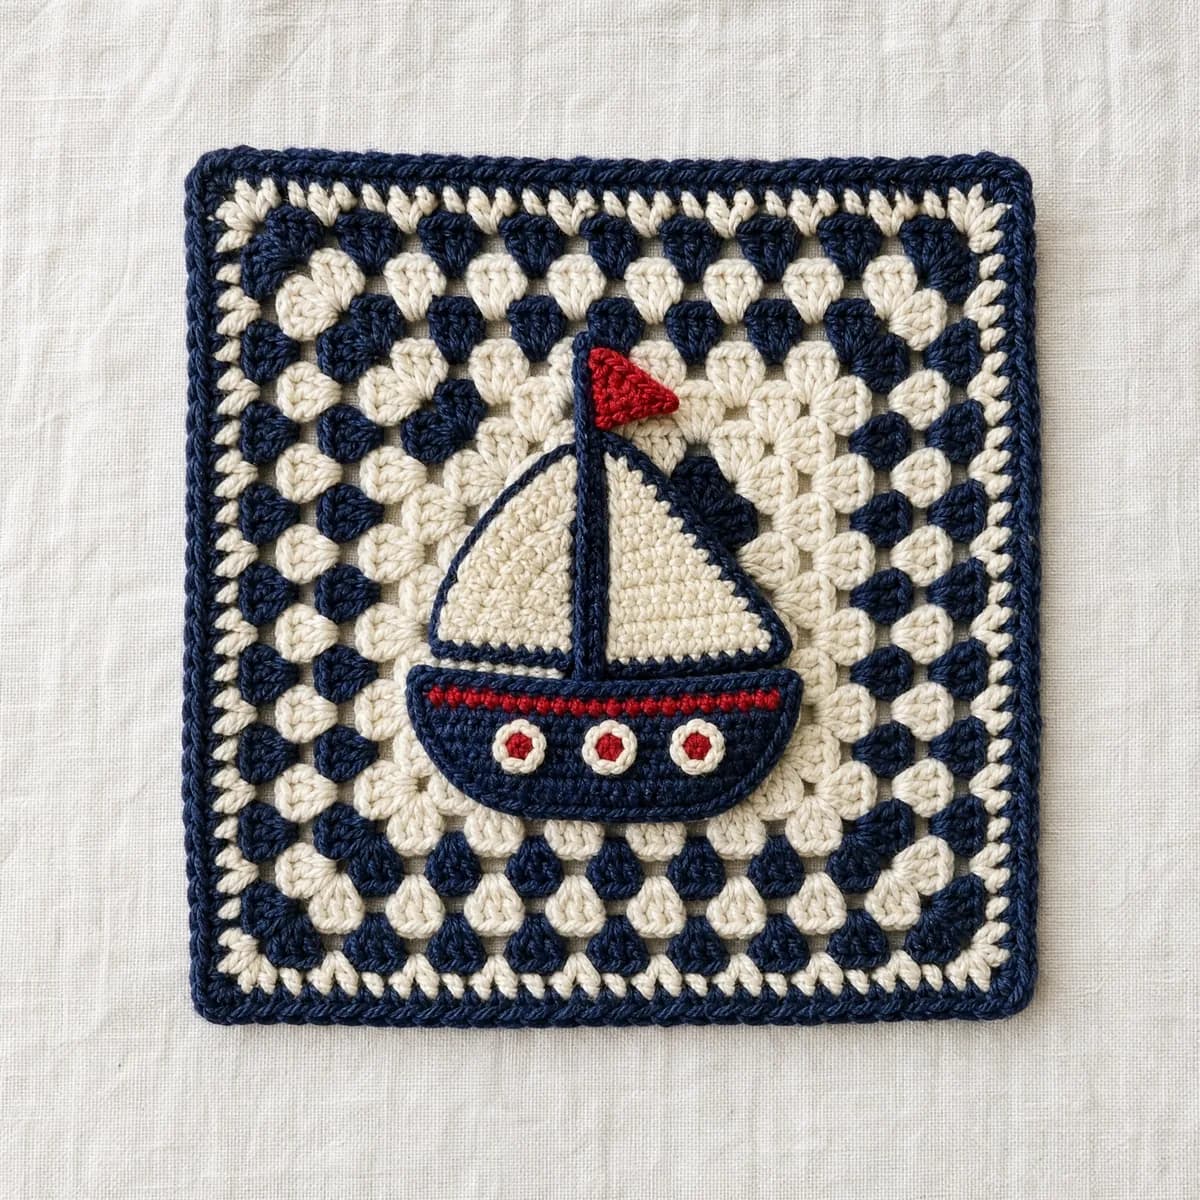
This one is a favorite of mine because it isn't just a square, it's a tiny scene. A cream-and-navy background builds up in classic granny rounds, and then a little navy sailboat, its hull, its main sail, and its small sail, gets stitched separately and sewn on top, so the boat sits up proud against the background like it's caught mid-glide across calm water.
You'll work the background with a magic ring start, standard corner increases, and simple double crochet rounds, so if you've made a traditional granny square before, the base will feel instantly familiar. The applique pieces add a little something new, sewing shapes onto a finished background, which makes this a lovely first project for anyone ready to move past a plain granny square without jumping into anything complicated.
Finished, it comes in at about 7 by 7 inches, with the sailboat sitting neatly inside its cream field and a tidy border framing the whole thing. I love using it as a one-off accent square tucked into a bigger afghan, propped on a shelf as a little mat, or stitched up in multiples for a whole nautical-themed throw.
Variations
Idea 1
This square is easy to make your own. Swap the navy for a deep teal or slate blue if you want a softer, more weathered look, or try the sailboat in a bright color like coral or mustard for a cheerful, playful version. The background works beautifully in any two neutral or pastel shades too, think soft gray and white, or sand and sky blue, if you want the boat to be the clear star. You can also size things up by adding another round or two in a fresh color before the border, which gives you a bigger square for a pillow front or a blanket that needs fewer motifs. And if worsted weight isn't your thing, this pattern adapts nicely to a lighter DK yarn with a smaller hook for a more delicate, refined finish.
Idea 2
I keep coming back to this square because it makes me smile every time I finish one. There's something so satisfying about building a plain, tidy background and then watching a little boat appear on top of it, like it sailed in while you weren't looking. It's a wonderful project for using up small amounts of yarn in three colors, and it's forgiving too, since the applique pieces are small and sewing them on gives you a chance to adjust placement until it looks just right. I also love that it teaches a new skill, working a shape separately and attaching it, without asking you to learn anything intimidating. By the time you finish your first one, you'll want to make a whole little fleet.
Common mistakes
Losing track of corner spaces
It's easy to stitch into the chain itself instead of the space beneath it. Keep your ch-2 corners a little loose so you can always see and find the space clearly.
Skipping a snug magic ring cinch
A loose center ring leaves a gap right where the boat's hull will eventually sit. Pull the tail firmly before you close Round 1 so the center stays neat.
Miscounting stitches across the border
The border round has a lot going on, with groups of stitches and spaces to track. Count each side as you go rather than waiting until the end to check your total.
Sewing the applique off-center
Rushing the placement can leave the boat looking crooked on the background. Pin or baste the hull and sails in place first, step back to check the balance, and only then stitch them down for good.
Materials & abbreviations
Materials
- Worsted-weight yarn in 3 colors (cream, navy, red) — about 25–40 g total per square
- 5.0 mm crochet hook
- Yarn needle for weaving in ends
- Scissors
Abbreviations
- ch
- chain
- dc
- double crochet
- sc
- single crochet
- sl st
- slip stitch
- sp
- space
- st(s)
- stitch(es)
- rnd
- round
- MR
- magic ring
Main pattern
The Background Square — Round 1
With cream, in a magic ring: ch 3, 2 dc, ch 2, [3 dc, ch 2] 3 times; sl st to top of ch-3 to join (12)
- Using cream yarn, in a magic ring: make 3 chain stitches, 2 double crochet, make 2 chain stitches, [3 double crochet, make 2 chain stitches] 3 times; slip stitch to top of ch-3 to join.
Tip Work the plain background square first — the little navy sailboat pieces are sewn on at the end. Every count below is math-verified.
The Background Square — Round 2
sl st to corner sp, ch 3, 2 dc, ch 2, 3 dc in same corner, ch 1, [(3 dc, ch 2, 3 dc) in corner sp, ch 1, ] 3 times; sl st to join (24)
- Slip stitch to corner space, make 3 chain stitches, 2 double crochet, make 2 chain stitches, 3 double crochet in same corner, make 1 chain stitch, [(3 double crochet, make 2 chain stitches, 3 double crochet) in corner space, make 1 chain stitch, ] 3 times; slip stitch to join.
The Background Square — Round 3
With navy, sl st to corner sp, ch 3, 2 dc, ch 2, 3 dc in same corner, ch 1, 3 dc, ch 1, [(3 dc, ch 2, 3 dc) in corner sp, ch 1, 3 dc, ch 1, ] 3 times; sl st to join (36)
- Using navy yarn, slip stitch to corner space, make 3 chain stitches, 2 double crochet, make 2 chain stitches, 3 double crochet in same corner, make 1 chain stitch, 3 double crochet, make 1 chain stitch, [(3 double crochet, make 2 chain stitches, 3 double crochet) in corner space, make 1 chain stitch, 3 double crochet, make 1 chain stitch, ] 3 times; slip stitch to join.
The Background Square — Round 4
sl st to corner sp, ch 3, 2 dc, ch 2, 3 dc in same corner, ch 1, 3 dc, ch 1, 3 dc, ch 1, [(3 dc, ch 2, 3 dc) in corner sp, ch 1, 3 dc, ch 1, 3 dc, ch 1, ] 3 times; sl st to join (48)
The Background Square — Round 5
With cream, sl st to corner sp, ch 3, 2 dc, ch 2, 3 dc in same corner, ch 1, 3 dc, ch 1, 3 dc, ch 1, 3 dc, ch 1, [(3 dc, ch 2, 3 dc) in corner sp, ch 1, 3 dc, ch 1, 3 dc, ch 1, 3 dc, ch 1, ] 3 times; sl st to join (60)
The Background Square — Border
sl st into the corner ch-2 sp, ch 1, [3 sc in the corner sp, (sc in next 3 sts, sc in next sp) 4 times, sc in next 3 sts] 4 times; sl st to the first sc (88)
- Slip stitch into the corner ch-2 space, make 1 chain stitch, [3 single crochet in the corner space, (single crochet in next 3 stitches, single crochet in next space) 4 times, single crochet in next 3 stitches] 4 times; slip stitch to the first single crochet.
The Background Square — Additional guidance
Slip stitch to corner space, make 3 chain stitches, 2 double crochet, make 2 chain stitches, 3 double crochet in same corner, make 1 chain stitch, 3 double crochet, make 1 chain stitch, 3 double crochet, make 1 chain stitch, [(3 double crochet, make 2 chain stitches, 3 double crochet) in corner space, make 1 chain stitch, 3 double crochet, make 1 chain stitch, 3 double crochet, make 1 chain stitch, ] 3 times; slip stitch to join.
The Background Square — Additional guidance
Using cream yarn, slip stitch to corner space, make 3 chain stitches, 2 double crochet, make 2 chain stitches, 3 double crochet in same corner, make 1 chain stitch, 3 double crochet, make 1 chain stitch, 3 double crochet, make 1 chain stitch, 3 double crochet, make 1 chain stitch, [(3 double crochet, make 2 chain stitches, 3 double crochet) in corner space, make 1 chain stitch, 3 double crochet, make 1 chain stitch, 3 double crochet, make 1 chain stitch, 3 double crochet, make 1 chain stitch, ] 3 times; slip stitch to join.
The Hull — Round 1
ch 10, sc in 2nd ch from hook, 7 sc, 3 sc in last ch, working back along the underside, 7 sc, 2 sc in last (20)
Tip Worked in navy. Leave a long tail for sewing.
The Main Sail — Round 1
ch 2, 2 sc in 2nd ch from hook (2)
Tip Worked in cream. Leave a long tail for sewing.
The Main Sail — Round 2
ch 1, turn, [inc] repeat 2 times (4)
The Main Sail — Round 3
ch 1, turn, inc, 2 sc, inc (6)
The Main Sail — Round 4
ch 1, turn, inc, 4 sc, inc (8)
The Main Sail — Round 5
ch 1, turn, inc, 6 sc, inc (10)
The Small Sail — Round 1
ch 2, 2 sc in 2nd ch from hook (2)
Tip Worked in red. Leave a long tail for sewing.
The Small Sail — Round 2
ch 1, turn, [inc] repeat 2 times (4)
The Small Sail — Round 3
ch 1, turn, inc, 2 sc, inc (6)
Assembly — Bringing It Together — Step 1
Pin the Hull just below center on the background square, curved/pointed edge running side to side so its two tips point left and right.
Assembly — Bringing It Together — Step 2
Whipstitch the Hull down around its entire outer edge using navy thread.
Assembly — Bringing It Together — Step 3
Pin the Main Sail directly above the right half of the Hull, its wide bottom row resting on the Hull's top edge and angled slightly right.
Assembly — Bringing It Together — Step 4
Pin the Small Sail so its bottom row also rests on the Hull's top edge just left of the Main Sail, angled slightly left so the two sails form a gentle V at the mast.
Assembly — Bringing It Together — Step 5
Sew both sails down around their edges with thread matching each piece's color.
Assembly — Bringing It Together — Step 6
Add the mast and wave embroidery last, stitching through all layers to anchor the sails to the Hull.
Assembly — Bringing It Together — Embroidery
Work one straight stitch in navy from the center top of the Hull up to where the sail bases meet, to form the mast.
Assembly — Bringing It Together — Embroidery
Work 2-3 short horizontal straight stitches in cream just below the Hull's pointed bottom edge to suggest gentle waves.
Assembly — Bringing It Together — Embroidery
Optional: work a tiny red V-shaped straight stitch at the top of the mast for a pennant flag.
Important notes
Gauge: the finished square is about 7 x 7 inches in Worsted weight yarn with a 5.0 mm hook. Tight crocheters can go up half a hook size; loose ones down half.
Color plan: the sample uses cream, navy, red in round order — change colors with a slip-stitch join in the first stitch of the new round.
Block your background square before sewing on the sailboat pieces, a flat, evenly shaped base makes the applique sit much straighter.
Use a yarn needle and matching thread-weight strands to whipstitch the boat pieces down invisibly, keeping stitches small and close together along the edges.
Frequently asked questions
Not at all, if you can chain, double crochet, and slip stitch, you have everything you need for the background. The only new skill is sewing the small applique pieces on afterward, which just takes a needle and a little patience.
The hull, main sail, and small sail are worked as their own small pieces and then whipstitched onto the finished cream background using a yarn needle. Pinning them in place first makes it easy to get the positioning just right before you stitch.
This pattern is written for worsted weight yarn with a 5.0 mm hook, which keeps the stitches nice and defined. The finished square measures about 7 by 7 inches.
Absolutely, the three-color structure is really flexible. Just keep enough contrast between the background and the boat so the sailboat still reads clearly against the sea.
Yes, its finished size and classic round construction make it easy to mix into a larger blanket alongside plain or simple textured granny squares, especially if you carry the same color palette through.