Little Tulip Granny Square — Easy Floral Appliqué Crochet Pattern
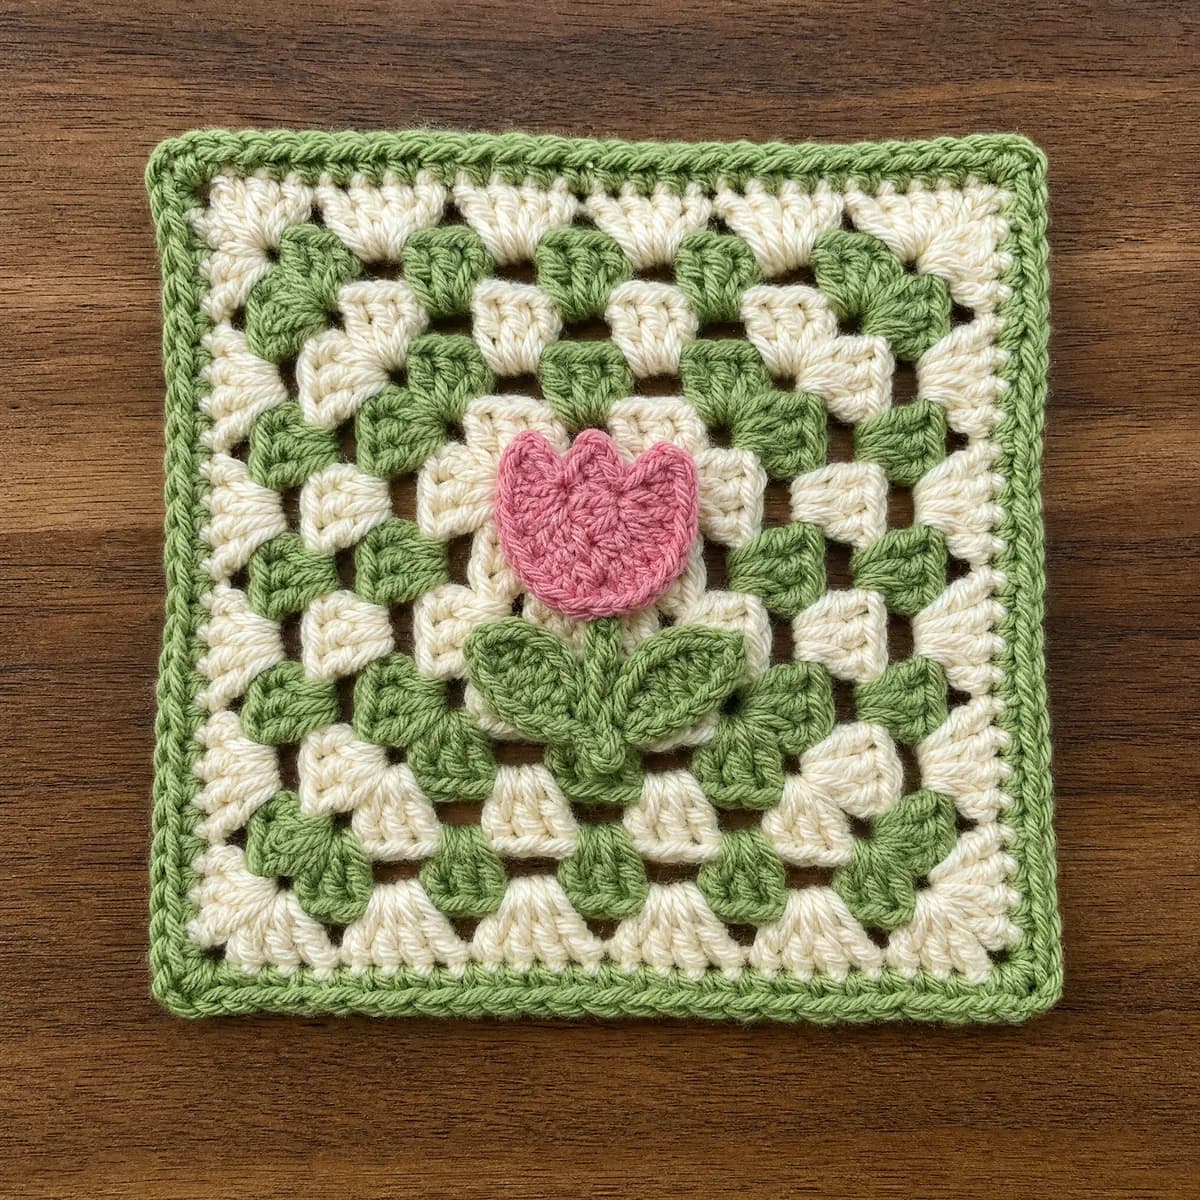
The Little Tulip Granny Square combines a traditional granny-square background with a small crocheted flower appliqué made from a separate tulip head, stem, and two leaves. The background uses familiar granny clusters and corner spaces, while the flower adds a decorative three-dimensional detail to
About this pattern
The Little Tulip Granny Square combines two simple crochet techniques: a classic granny-square background and a separately constructed floral appliqué.
The background begins in a magic ring and grows through five granny-cluster rounds. Corners use the familiar **3 dc, ch 2, 3 dc** construction, while each new round adds another 3-dc cluster along each side. A final single-crochet border gives the square a cleaner outer edge.
The tulip is made from four small pieces: one pink flower head, one green stem, and two green leaves. These pieces are crocheted separately and sewn onto the completed background, allowing the flower to sit slightly raised from the square.
With worsted-weight yarn and a 5.0 mm hook, the finished motif measures approximately 7 inches square. Its larger size makes it suitable for blankets, cushions, bag panels, nursery decor, and other projects where a decorative floral square can become a focal point.
The Little Tulip Granny Square combines a traditional granny-square background with a small crocheted flower appliqué made from a separate tulip head, stem, and two leaves. The background uses familiar granny clusters and corner spaces, while the flower adds a decorative three-dimensional detail to the finished square.
This pattern is beginner-friendly for crocheters who are already comfortable with basic granny squares, double crochet, single crochet, simple increases, and sewing small pieces together. The finished square can be used for baby blankets, cushions, bags, wall hangings, or other floral motif projects.
Variations
Different Tulip Colors
Replace the pink with yellow, coral, purple, red, or another flower color. Keep the stem and leaves green if you want the tulip shape to remain immediately recognizable.
Dark Background
Use gray, charcoal, navy, or another darker background color to make a bright tulip stand out more strongly. Maintain enough contrast between the flower and the granny square.
Larger Square
Add one or more additional granny rounds before working the final border. Continue the established pattern by adding one extra 3-dc cluster along each side for every new round while preserving the **3 dc, ch 2, 3 dc** corners.
Floral Blanket
Make several squares with different tulip colors and join them together after blocking. Repeating the same background colors while changing the flower colors can create a coordinated garden-style blanket.
Common mistakes
Losing Track of the Corners
A corner may accidentally be treated like a normal side space, causing the square to become uneven.
Try this**How to fix it:** Place a stitch marker in every ch-2 corner space after completing each round. Check for exactly four corners before beginning the next round.
Sewing the Appliqué Too Tightly
The granny-square background puckers or pulls inward around the flower.
Try this**How to fix it:** Keep the sewing yarn relaxed. After every few stitches, lay the square flat and check that the background has not begun to distort.
Attaching the Flower Off-Center
The tulip may lean noticeably to one side or sit too high or low on the square.
Try this**How to fix it:** Position the stem, both leaves, and tulip head before sewing anything. Use pins or removable stitch markers to hold the arrangement while checking the placement.
Leaving Bulky Ends Under the Appliqué
Yarn tails create visible bumps beneath the flower pieces.
Try this**How to fix it:** Weave in unnecessary ends before assembly. Keep only the tails needed for sewing the pieces to the square.
Reversing the Tulip Head
The narrow section sits at the top and the flower looks upside down.
Try this**How to fix it:** Place the 3-stitch edge against the stem. The 7-stitch edge should face upward and form the wider top of the flower.
Materials & abbreviations
Materials
- Worsted-weight yarn in cream, leaf green, and tulip pink
- Approximately 25–40 g total yarn per square
- 5.0 mm crochet hook
- Yarn needle
- Scissors
- Stitch markers or pins for appliqué placement
Abbreviations
- **ch**
- Chain
- **sc**
- Single crochet
- **dc**
- Double crochet
- **sl st**
- Slip stitch
- **st**
- Stitch
- **sts**
- Stitches
- **sp**
- Space
- **inc**
- Increase
- **rep**
- Repeat
Main pattern
Round 1 — Granny Square Center
**Pattern:** With cream yarn, make a magic ring. Ch 3. Work 2 dc into the ring. Ch 2. Work: **[3 dc, ch 2] 3 times** Sl st to the top of the beginning ch 3. **Step-by-step:** The beginning ch 3 acts as the first double crochet. Work two more double crochets into the magic ring to complete the first 3-dc cluster. Chain 2 to form the first corner. Continue working three double crochets followed by ch 2 until you have four clusters and four corner spaces. Pull the magic ring closed and join to the top of the beginning ch 3. **Stitch count:** 12 dc.
Round 2 — Expand the Granny Square
**Pattern:** Sl st to the next corner sp. Ch 3. Work 2 dc, ch 2, 3 dc in the same corner sp. Ch 1. Work: **[(3 dc, ch 2, 3 dc) in next corner sp, ch 1] 3 times** Sl st to join. **Step-by-step:** Move into the next corner space with slip stitches. Each corner receives two 3-dc clusters separated by ch 2. The ch-1 spaces between corners separate the granny clusters along each side. Repeat the same corner construction around the square and join at the end. **Stitch count:** 24 dc.
Round 3 — Add Leaf Green
**Pattern:** Change to leaf green yarn. Sl st to a corner sp. Ch 3. Work 2 dc, ch 2, 3 dc in the same corner sp. Ch 1. Work 3 dc in the next side sp. Ch 1. Work: **[(3 dc, ch 2, 3 dc) in next corner sp, ch 1, 3 dc in next side sp, ch 1] 3 times** Sl st to join. **Stitch count:** 36 dc.
Round 4 — introduces a granny cluster in the center of each side.
**Pattern:** Each corner still receives **3 dc, ch 2, 3 dc**. Between the corners, work one 3-dc cluster into the existing ch-1 space. Chain 1 between every cluster and corner section.
Round 5 — Continue the Green Background
**Pattern:** Sl st to a corner sp. Ch 3. Work 2 dc, ch 2, 3 dc in the same corner sp. Ch 1. Work 3 dc in next side sp. Ch 1. Work 3 dc in next side sp. Ch 1. Work: **[(3 dc, ch 2, 3 dc) in next corner sp, ch 1, 3 dc in next side sp, ch 1, 3 dc in next side sp, ch 1] 3 times** Sl st to join. **Step-by-step:** The granny square continues growing in the same way. Each corner receives the standard corner group, while each side now contains two separate 3-dc clusters. Chain 1 between every group so the fabric has room to expand evenly. **Stitch count:** 48 dc.
Round 6 — Return to Cream
**Pattern:** Change to cream yarn. Sl st to a corner sp. Ch 3. Work 2 dc, ch 2, 3 dc in the same corner sp. Ch 1. Work 3 dc in next side sp. Ch 1. Work 3 dc in next side sp. Ch 1. Work 3 dc in next side sp. Ch 1. Work: **[(3 dc, ch 2, 3 dc) in next corner sp, ch 1, 3 dc in next side sp, ch 1, 3 dc in next side sp, ch 1, 3 dc in next side sp, ch 1] 3 times** Sl st to join. **Stitch count:** 60 dc.
Round 7 — returns to cream and continues the same granny-square rhythm.
**Pattern:** Each corner still uses **3 dc, ch 2, 3 dc**. Each side now contains three 3-dc clusters separated by ch-1 spaces. Keep the corner spaces easy to identify because they will be important when adding the border.
Round 8 — Single Crochet Border
**Pattern:** Sl st into a corner ch-2 sp. Ch 1. Work: **[3 sc in corner sp, (sc in next 3 sts, sc in next sp) 4 times, sc in next 3 sts] 4 times** Sl st to the first sc. **Step-by-step:** The border changes from granny clusters to single crochet. Begin in a corner space and place three single crochets into that corner. Along each side, work one single crochet into each of the three stitches in a granny cluster, then one single crochet into the chain space between clusters. Repeat this pattern across each side. Work three single crochets into every corner to help the square turn cleanly. **Stitch count:** 88 sc.
Step 9 — Crochet the Tulip Head
**Pattern:** With tulip pink yarn, leave a long tail for sewing. Ch 4. Sc in the next 3 ch. Turn. Ch 1. Inc in first st. Sc in next st. Inc in last st. Turn. Ch 1. Inc in first st. Sc in next 3 sts. Inc in last st. Leave a long tail for sewing. **Step-by-step:** The tulip head is worked back and forth in short rows. Begin with three single crochets. On each following row, increase once at both ends. This gradually widens the piece from three stitches to five and then seven stitches. The narrow edge will later sit against the stem, while the wider edge forms the top of the tulip flower. **Stitch count:** 7 sc.
Step 10 — Crochet the Stem
**Pattern:** With leaf green yarn, leave a long tail for sewing. Ch 7. Sc in the next 6 ch. Leave a long tail for sewing. **Step-by-step:** The stem is a simple narrow strip. Chain 7, then begin in the second chain from the hook and work one single crochet in each chain across. The long yarn tail will be used to sew the stem onto the background square. **Stitch count:** 6 sc.
Step 11 — Crochet the Left Leaf
**Pattern:** With leaf green yarn, leave a long tail for sewing. Ch 5. Sc in next 3 ch. Work 3 sc in the last ch. Continue around the opposite side of the foundation chain. Sc in next 3 sts. Leave a long tail for sewing. **Step-by-step:** The leaf is worked around both sides of a short foundation chain. After working three single crochets along the first side, place three single crochets into the last chain. These extra stitches help the end curve around naturally. Then continue down the opposite side of the foundation chain with three more single crochets. The result should be a small elongated leaf with a rounded outer edge. **Stitch count:** 9 sc.
Step 12 — Crochet the Right Leaf
**Pattern:** With leaf green yarn, leave a long tail for sewing. Ch 5. Sc in next 3 ch. Work 3 sc in the last ch. Continue around the opposite side of the foundation chain. Sc in next 3 sts. Leave a long tail for sewing. **Step-by-step:** Make the second leaf exactly like the first. Creating two matching leaves allows them to sit symmetrically on either side of the stem. **Stitch count:** 9 sc.
Step 13 — Attach the Stem
**Pattern:** Place the stem vertically in the lower center of the background square. Position it from approximately 1 inch above the bottom edge toward the center of the square. Pin or hold it in place. Sew along both long edges. **Step-by-step:** Before sewing, position all of the flower pieces loosely on the square to check the overall balance. The stem should sit vertically and remain flat against the background. Use small sewing stitches and avoid pulling the yarn too tightly, which could cause the granny square to pucker.
Step 14 — Attach the Leaves
**Pattern:** Position one leaf on each side of the lower stem. Angle the leaves outward to create a shallow V shape. Whipstitch around the curved outer edge of each leaf. Leave the pointed base open where it meets the stem. **Step-by-step:** Place the two leaves near the bottom portion of the stem. Angle them in opposite directions so they look balanced. Sew around the visible curved edges using relaxed tension. The leaf bases can remain partly open where they overlap the stem.
Step 15 — Attach the Tulip Head
**Pattern:** Place the tulip head at the top of the stem. Position the narrow 3-stitch edge so it overlaps the top of the stem. Arrange the wider 7-stitch edge above it. Sew around the sides and top edge. Tack the narrow base securely to the stem. **Step-by-step:** The narrow edge of the tulip head is the bottom of the flower. Place it directly over the top end of the stem. The wider seven-stitch edge should face upward and form the curved top of the bloom. Check that the flower is centered before sewing it permanently into place.
Step 16 — Add the Flower Embroidery
**Pattern:** With cream yarn or thread, work one straight stitch from the base of the tulip head toward the top edge to suggest a central petal seam. Add 2 or 3 short straight stitches fanning upward from the base of the tulip head. **Step-by-step:** These embroidery stitches are optional decorative details that help suggest separate petals. Use small straight stitches and avoid pulling them tightly enough to distort the flower.
Finishing
Weave in all remaining yarn tails on the wrong side of the square.
Check that the tulip head, leaves, and stem are attached securely while the background remains flat.
Lightly block the square to approximately 7 × 7 inches if needed.
Shape the corners evenly and gently arrange the appliqué so the flower remains centered.
Pattern note: The source also includes an instruction to weave in all appliqué tails before working the border, while the written pattern places the border before the appliqué construction. The round order above preserves the main written pattern sequence. If you prefer to sew the appliqué before adding the border, verify that assembly order before publication.
Important notes
**Keep track of the corner spaces.** — As the square becomes larger, the ch-2 corners can be harder to identify. Place a stitch marker in each corner if needed.
**Block the background before attaching the flower.** — A flat square makes it easier to position the stem, leaves, and tulip head evenly.
**Do not sew the appliqué too tightly.** — Tight sewing stitches can pull the background fabric inward and create puckering.
**Leave long tails on the appliqué pieces.** — The tulip head, stem, and leaves are sewn to the square using their yarn tails, so leave enough length for comfortable sewing.
**Pin the pieces before sewing.** — Arrange the complete tulip first and check the overall position before permanently attaching any piece.
**Adjust hook size if necessary.** — The sample measures approximately 7 × 7 inches with worsted-weight yarn and a 5.0 mm hook. If your tension is very tight or loose, changing hook size slightly can help achieve the intended size.
Frequently asked questions
Yes, especially for someone who already knows how to make a basic granny square. The appliqué introduces only simple short rows, increases, and sewing techniques.
Check the corner construction and make sure every corner contains **3 dc, ch 2, 3 dc**. Also verify that you have not accidentally added or omitted a granny cluster along one side.
Yes. A smooth cotton yarn can create firmer leaves and a more defined tulip head. The finished size may differ depending on the yarn thickness and your tension.
The source contains conflicting placement information about when the appliqué is attached relative to the border. The main written pattern lists the border before the flower pieces, so that sequence is preserved here. If changing the assembly order, verify the intended construction first.
Arrange all four appliqué pieces before sewing. Start with the stem, then position the leaves and tulip head around it. Pin everything in place and view the entire square before attaching the pieces.
Yes. Additional granny rounds can be added before the final border as long as you continue the same corner-and-side progression consistently.