Sage Shell Turtle Granny Square — Free 6-Round Granny Square Pattern
Crochet the Sage Shell Turtle Granny Square granny square: 6 math-checked rounds in sage green, cream and warm brown. A 7 x 7" classic motif with every stitch c
About this pattern
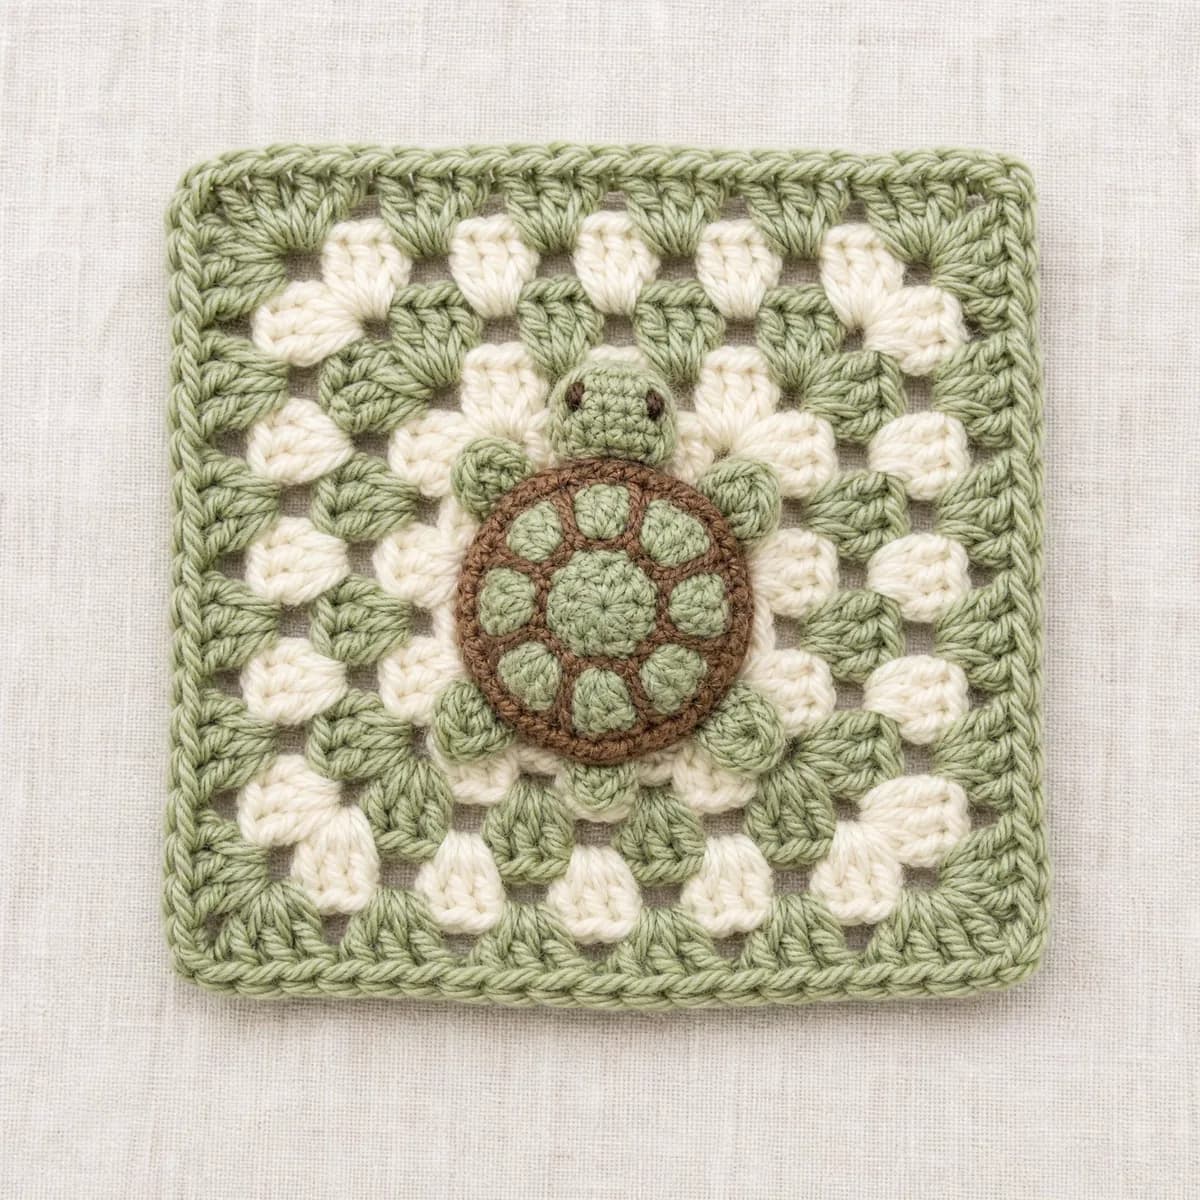
This original design is a classic granny square worked in 6 rounds of sage green, cream and warm brown. Every round carries its exact stitch count, so you always know where you stand.
You'll only need the basics — chains, double crochet and slip-stitch joins — making it a comfortable make for a Beginner crocheter.
The finished square measures about 7 x 7 inches in Worsted weight yarn and blocks beautifully flat.
Variations
Idea 1
Work all 6 rounds in a single shade for a modern, quiet version, or swap the palette for your leftovers — the structure doesn't care what colors you feed it. Repeat the final growth round once or twice before the border for a bigger square (each round adds roughly an inch), or drop to a lighter yarn and smaller hook for a daintier motif.
Idea 2
I designed this square around the colors first — sage green, cream and warm brown — and the rhythm second. The rounds settle into that lovely repetitive flow where your hands take over, and because every count is verified you can relax and enjoy it. It's the kind of square I make a small stack of in an evening without noticing the time go by.
Common mistakes
Crowding the corner spaces
Give every corner its full group of stitches — a skipped corner turns the square into a circle.
Missing the starting chain
The chain at the start of a round stands in for the first stitch. Count it, or your totals will run one short.
Joining in the wrong stitch
Close each round into the top of the starting chain, not a chain space, so the seam stays straight.
Pulling the yarn too tight
A relaxed tension keeps the square flat. If it cups, go up half a hook size.
Materials & abbreviations
Materials
- Worsted-weight yarn in 3 colors (sage green, cream, warm brown) — about 25–40 g total per square
- 5.0 mm crochet hook
- Yarn needle for weaving in ends
- Scissors
Abbreviations
- ch
- chain
- dc
- double crochet
- sc
- single crochet
- sl st
- slip stitch
- sp
- space
- st(s)
- stitch(es)
- rnd
- round
- MR
- magic ring
Main pattern
The Background Square — Round 1
With sage green, in a magic ring: ch 3, 2 dc, ch 2, [3 dc, ch 2] 3 times; sl st to top of ch-3 to join (12)
- Using sage green yarn, in a magic ring: make 3 chain stitches, 2 double crochet, make 2 chain stitches, [3 double crochet, make 2 chain stitches] 3 times; slip stitch to top of ch-3 to join.
Tip Work the plain background square first — the sage shell turtle pieces are sewn on at the end. Every count below is math-verified.
The Background Square — Round 2
sl st to corner sp, ch 3, 2 dc, ch 2, 3 dc in same corner, ch 1, [(3 dc, ch 2, 3 dc) in corner sp, ch 1, ] 3 times; sl st to join (24)
- Slip stitch to corner space, make 3 chain stitches, 2 double crochet, make 2 chain stitches, 3 double crochet in same corner, make 1 chain stitch, [(3 double crochet, make 2 chain stitches, 3 double crochet) in corner space, make 1 chain stitch, ] 3 times; slip stitch to join.
The Background Square — Round 3
With cream, sl st to corner sp, ch 3, 2 dc, ch 2, 3 dc in same corner, ch 1, 3 dc, ch 1, [(3 dc, ch 2, 3 dc) in corner sp, ch 1, 3 dc, ch 1, ] 3 times; sl st to join (36)
- Using cream yarn, slip stitch to corner space, make 3 chain stitches, 2 double crochet, make 2 chain stitches, 3 double crochet in same corner, make 1 chain stitch, 3 double crochet, make 1 chain stitch, [(3 double crochet, make 2 chain stitches, 3 double crochet) in corner space, make 1 chain stitch, 3 double crochet, make 1 chain stitch, ] 3 times; slip stitch to join.
The Background Square — Round 4
sl st to corner sp, ch 3, 2 dc, ch 2, 3 dc in same corner, ch 1, 3 dc, ch 1, 3 dc, ch 1, [(3 dc, ch 2, 3 dc) in corner sp, ch 1, 3 dc, ch 1, 3 dc, ch 1, ] 3 times; sl st to join (48)
The Background Square — Round 5
With sage green, sl st to corner sp, ch 3, 2 dc, ch 2, 3 dc in same corner, ch 1, 3 dc, ch 1, 3 dc, ch 1, 3 dc, ch 1, [(3 dc, ch 2, 3 dc) in corner sp, ch 1, 3 dc, ch 1, 3 dc, ch 1, 3 dc, ch 1, ] 3 times; sl st to join (60)
The Background Square — Border
sl st into the corner ch-2 sp, ch 1, [3 sc in the corner sp, (sc in next 3 sts, sc in next sp) 4 times, sc in next 3 sts] 4 times; sl st to the first sc (88)
- Slip stitch into the corner ch-2 space, make 1 chain stitch, [3 single crochet in the corner space, (single crochet in next 3 stitches, single crochet in next space) 4 times, single crochet in next 3 stitches] 4 times; slip stitch to the first single crochet.
The Background Square — Additional guidance
Slip stitch to corner space, make 3 chain stitches, 2 double crochet, make 2 chain stitches, 3 double crochet in same corner, make 1 chain stitch, 3 double crochet, make 1 chain stitch, 3 double crochet, make 1 chain stitch, [(3 double crochet, make 2 chain stitches, 3 double crochet) in corner space, make 1 chain stitch, 3 double crochet, make 1 chain stitch, 3 double crochet, make 1 chain stitch, ] 3 times; slip stitch to join.
The Background Square — Additional guidance
Using sage green yarn, slip stitch to corner space, make 3 chain stitches, 2 double crochet, make 2 chain stitches, 3 double crochet in same corner, make 1 chain stitch, 3 double crochet, make 1 chain stitch, 3 double crochet, make 1 chain stitch, 3 double crochet, make 1 chain stitch, [(3 double crochet, make 2 chain stitches, 3 double crochet) in corner space, make 1 chain stitch, 3 double crochet, make 1 chain stitch, 3 double crochet, make 1 chain stitch, 3 double crochet, make 1 chain stitch, ] 3 times; slip stitch to join.
The Shell — Round 1
6 sc in a magic ring (6)
Tip Worked in sage green. Leave a long tail for sewing.
The Shell — Round 2
[inc] repeat 6 times (12)
The Shell — Round 3
[sc, inc] repeat 6 times (18)
The Shell — Round 4
[sc in next 2 sts, inc] repeat 6 times (24)
The Shell Center — Round 1
6 sc in a magic ring (6)
Tip Worked in warm brown. Leave a long tail for sewing.
The Shell Center — Round 2
[inc] repeat 6 times (12)
The Head — Round 1
6 sc in a magic ring (6)
Tip Worked in cream. Leave a long tail for sewing.
The Head — Round 2
[inc] repeat 6 times (12)
The Legs — Round 1
6 sc in a magic ring (6)
Tip Worked in warm brown. Leave a long tail for sewing.
Assembly — Bringing It Together — Step 1
Pin the Shell (sage green) centered on the background square, leaving space above for the head and around the edges for the legs and tail; whip stitch around its outer edge to secure.
Assembly — Bringing It Together — Step 2
Center the Shell Center (warm brown) circle on top of the Shell and whip stitch around its edge, forming the two-tone patterned shell.
Assembly — Bringing It Together — Step 3
Tuck the top edge of the Head (cream) just under the top edge of the Shell and sew around its visible edge.
Assembly — Bringing It Together — Step 4
Make 4 Legs (warm brown); tuck the flat edge of each one under the Shell at the front-left, front-right, back-left, and back-right, spacing them evenly, and sew around each visible curved edge.
Assembly — Bringing It Together — Step 5
Tuck the chain edge of the Tail (warm brown) under the bottom edge of the Shell directly opposite the Head and sew in place.
Assembly — Bringing It Together — Step 6
Finish with the embroidered eyes, smile, and shell pattern lines as described in embroidery.
Assembly — Bringing It Together — Embroidery
With warm brown, work two small straight-stitch eyes side by side near the top edge of the cream Head.
Assembly — Bringing It Together — Embroidery
With warm brown, work one short curved straight stitch below the eyes for a smile.
Assembly — Bringing It Together — Embroidery
With cream, work 6 short straight stitches radiating out from the center of the Shell Center circle onto the sage green Shell, spaced evenly like spokes, to suggest a patterned scute shell.
Important notes
Gauge: the finished square is about 7 x 7 inches in Worsted weight yarn with a 5.0 mm hook. Tight crocheters can go up half a hook size; loose ones down half.
Color plan: the sample uses sage green, cream, warm brown in round order — change colors with a slip-stitch join in the first stitch of the new round.
Block the finished square with a light steam to sharpen the corners.
Keep the same joining direction on every square you make so a future blanket lies uniform.
Frequently asked questions
About 7 x 7 inches in Worsted weight yarn with a 5.0 mm hook. Lighter yarn makes a smaller, daintier square.
Yes — repeat the last growth round before the border. Each extra round adds roughly an inch on every side.
That's the stitch count for the round — how many stitches you should have when it's done. Every count in this pattern is math-verified.
It's rated Beginner. If you can chain and double crochet, you have everything you need.
Whip-stitch or slip-stitch them through the back loops, keeping every square facing the same way.