How to Make a Solid Hexagon: Free Crochet Granny Hexagon Pattern
Learn how to crochet a basic solid hexagon granny square in 5 easy rounds. Free beginner pattern with exact stitch counts, perfect for blankets, coasters and color play.
About this pattern
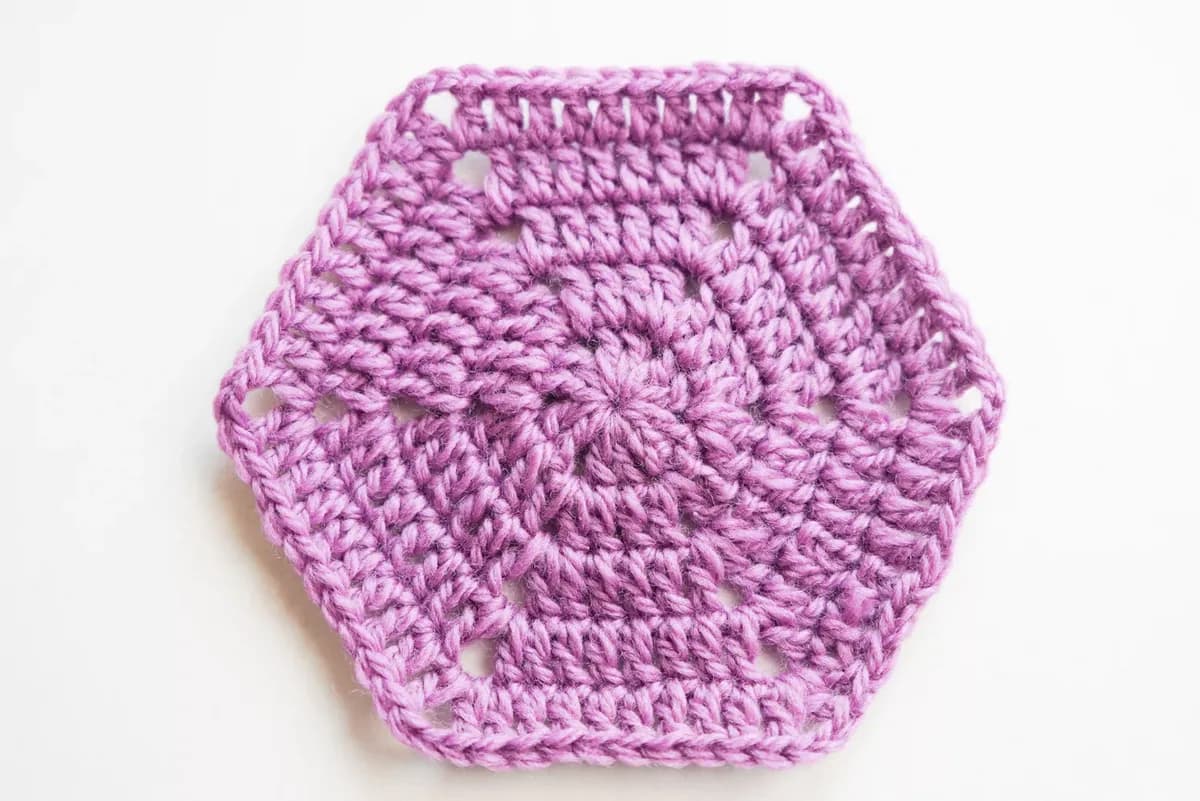
This pattern makes a basic solid hexagon granny square: a classic six-sided motif worked in the round from the center outward, with the sample stitched in a soft lavender DK sports weight yarn. The sides are packed with double crochet so the fabric stays dense, while a small ch-2 space sits at each of the six corners, giving the motif little decorative windows and a delicate, lacy touch at the points. It works up over five rounds in a single color, growing from a magic ring out to a crisp, flat six-sided shape.
The techniques here are refreshingly simple. You'll work in joined rounds, opening each round with ch3 that counts as a double crochet, placing a (dc + ch2 + dc) corner group in each of the six corner chain spaces, filling the sides with plain double crochet, and closing every round with a slip stitch into the top of the ch3. There's no puff stitch, no post work, no color changing to manage - just steady, confident stitching. That makes it an excellent beginner project, and a wonderful pattern to memorize. Expect around 20 to 30 minutes for your first hexagon, dropping to 15 once the rhythm clicks.
The finished hexagon measures approximately 2.5 inches per side in DK sports weight yarn, which makes it a comfortable palm-sized motif. It lies completely flat with defined corners and a smooth, close-knit surface that feels substantial in the hand. Made once, it's a sweet coaster or ornament; made forty times, it becomes a honeycomb blanket, a table runner, a pillow front or a scarf. A stack of them in a gift box, tied with twine, is a genuinely lovely handmade present.
Variations
Idea 1
I fell for this one the moment I finished round three and realized how dense the sides had become - solid double crochet all the way along, with just those tidy little ch-2 windows marking the six corners. That combination is rare in hexagon patterns, and it changes everything about what you can do with it. What I love most is how the six corner groups sit up and announce themselves. You can literally see the shape declaring itself round by round, and there's a real satisfaction in watching those angles sharpen as the piece grows. The single-color construction is a gift too. No yarn tails to weave every round, no bobbins tangling in your lap - just you, one skein, and five clean rounds. I've made these in front of the TV without looking down once past round two. And at 2.5 inches per side, they finish fast enough that you get that little dopamine hit of a completed project over and over in a single evening. It's the pattern I reach for when I want to crochet but don't want to think.
Common mistakes
Forgetting that the opening ch3 counts
Every round here opens with ch3 that stands in for the first dc. Count it out loud the first few rounds - ch3, then work your next stitch into the correct base stitch, and slip stitch into the top of that same ch3 at the end. If your hexagon looks like it's curling at one seam, that's almost always a short or miscounted starting chain. Some crocheters prefer a standing double crochet instead of the chain; it hides the seam beautifully and removes the height problem entirely.
Putting the wrong stitches in the six
The corners are what make this a hexagon rather than a circle. From round 2 on, every corner chain space gets exactly the same group - (dc + ch2 + dc) - no exceptions, no 'close enough'. Drop a stitch marker into each of the six corner spaces on round 2 and move them up as you go. If your shape is drifting round, you're under-stitching the corners; if it's ruffling and won't lie flat, you're over-stitching them.
Working into the spaces along the flat
In this hexagon the chain spaces belong to the corners only - the (dc+ch2+dc) groups go into the ch-sp, and everything between them goes into the actual stitches of the previous round. Tip the work toward the light and look for the V of each stitch top along the sides. If you see holes appearing along your straight edges, you've slipped into space-working out of granny habit - frog back to the corner and reset.
Joining the round with a slip stitch
Your slip-stitch join should always land in the top of the beginning ch3, exactly as the pattern says. If you consistently join a stitch off, the seam walks sideways and you'll see a visible diagonal scar in the finished motif. Check your join point against the previous round's join before you pull the loop through; they should stack in a straight vertical line.
Pulling the magic ring too tight in
The first round sets the whole motif. Round 1 ends with 'tighten tail' - snug the center closed but don't wrench it, because you want the hole gone, not the fabric strangled. If your hexagon is doming, the culprit is usually a death-grip center combined with tight corner groups. Loosen your overall tension by half a step or go up a hook size and try again.
Weaving in the yarn tails through only
Use your darning needle and travel the tail in at least two different directions through the back of the stitches, splitting the yarn plies as you go rather than sliding under whole stitches. On a dense fabric like this you have plenty of solid stitching to hide in, so take advantage of it. Trim close only after you've tugged and stretched the motif to confirm nothing slips.
Materials & abbreviations
Materials
- Yarn of your choice- 1 color, the sample is made with DK sports
- crochet hook
- Darning Needle
- Scissors
Abbreviations
- ch
- chain stitch
- ch-sp
- chain space
- dc
- double crochet
- rep
- repeat
- slst
- slip stitch for joining for different round.
Main pattern
Main Pattern — Round 1
Magic ring, ch3(count as dc), dc, ch2, [2dc, ch2] rep 5 times, tighten tail, slst to top of ch3.
- Start with a magic ring; make ch3 as standing st (count as dc); another dc, ch2; [2dc, ch2] repeat 5 times; tighten the tail; slst to top of ch3. Round 1 finished.
Main Pattern — Round 2
ch3 as dc standing, dc, (dc+ch2+dc) in next ch-sp, [2dc, (dc+ch2+dc) in next ch-sp] rep 5 times, slst to top of ch3.
- Make ch3 as standing st (count as dc); dc, (dc+ch2+dc) in next ch-sp; [2dc, (dc+ch2+dc) in next ch-sp] repeat 5 times, slst to top of ch3. Round 2 finished.
Main Pattern — Round 3
ch3 as dc standing, 2dc, (dc+ch2+dc) in next ch-sp, dc, [3dc, (dc+ch2+dc) in next ch-sp, dc] rep 5 times, slst to top of ch3.
- Make ch3 as standing st (count as dc); 2dc, (dc+ch2+dc) in next ch-sp, dc; [3dc, (dc+ch2+dc) in next ch-sp, dc] repeat 5 times, slst to top of ch3. Round 3 finished.
Main Pattern — Round 4
ch3 as standing st(count as dc), 3dc, (dc+ch2+dc) in next ch-sp, 2dc, [4dc, (dc+ch2+dc) in next ch-sp, 2dc] rep 5 times, slst to top of ch3.
- Make ch3 as standing st (count as dc); 3dc, (dc+ch2+dc) in next ch-sp, 2dc; [4dc, (dc+ch2+dc) in next ch-sp, 2dc] repeat 5 times, slst to top of ch3. Round 4 finished.
Main Pattern — Round 5
ch3 as standing st(count as dc), 4dc, (dc+ch2+dc) in next ch-sp, 3dc, [5dc, (dc+ch2+dc) in next ch-sp, 3dc] rep 5 times, slst to top of ch3, fasten off and weave in ends.
- Make ch3 as standing st (count as dc); 4dc, (dc+ch2+dc) in next ch-sp, 3dc; [5dc, (dc+ch2+dc) in next ch-sp, 3dc] repeat 5 times, slst to top of ch3, fasten off and weave in ends. Now we finished a basic hexagon solid granny square.
Important notes
Gauge: the completed granny square measures approximately 2.5 inches per side, worked in DK sports weight yarn. Your gauge doesn't need to match a pattern label here - it only needs to match itself. If you're making a blanket, stitch all your hexagons from the same yarn line with the same hook so every motif tiles cleanly.
Hook size is your flatness dial. Start with whatever your DK yarn's label recommends (usually 3.5mm to 4mm), then adjust: if the hexagon domes upward, go up a size; if it ruffles at the edges, go down. One hook size in either direction fixes almost every lie-flat problem in this pattern.
Place six stitch markers in the corner chain spaces from round 2 onward and move them up as you complete each round. It costs you ten seconds and it eliminates the single most common failure in hexagon motifs - losing track of which space is a true corner and which is just a gap.
Because this is a one-color pattern, you can chain-produce hexagons without ever breaking yarn between rounds. Wind off a small center-pull ball for each motif so you're not dragging a full skein around, and keep a small bowl or yarn cup beside you to stop it rolling.
Block your hexagons before joining, not after. Pin each one to a foam mat with all six corners pulled to true points, spritz lightly with water, and let it dry fully. Unblocked hexagons look uneven when joined; blocked ones snap together like tile.
Save your yarn tails until the motif is fully assembled if you're joining hexagons together. A tail left at a corner can be used for the join itself, which saves you weaving in two ends instead of one. Only trim once the piece is complete and you're sure you don't need it.
Frequently asked questions
approximately 2.5 inches per side in DK yarn, each hexagon spans about 5 inches point to point. For a baby blanket around 30 by 36 inches you'll want approximately 50 to 60 motifs depending on how tightly you join them. For a lap blanket, plan on 100 or more.
Doming almost always means your tension is too tight, usually starting at the magic ring and compounding through the corner groups. Try going up one hook size and consciously loosening your grip through the first two rounds. A light steam block will rescue a mildly domed hexagon, but a badly domed one is faster to redo.
Absolutely - the pattern works in any weight, you just get a different finished size. Worsted with a 5mm hook will give you roughly 3.25 inches per side, which makes blankets come together much faster. Just make sure every hexagon in a project uses the same yarn weight so they tile evenly.
Whip stitch through the back loops gives a nearly invisible flat seam that suits this dense fabric well. If you prefer a decorative line between motifs, single crochet joins add a visible ridge that can look lovely in a contrast color. Join-as-you-go on the final round also works and saves you the assembly stage entirely.
Yes, provided you're comfortable with chains, double crochet and slip stitches. There are no advanced techniques - no post stitches, no puffs, no color changes to juggle. The only thing that needs attention is keeping your six corners consistent, and stitch markers solve that in the first round.