Sunny Pineapple Granny Square — A Cheerful Beginner Pattern
A sunny pineapple appliqué blooms in cream, leaf green, and golden yellow across 6 easy rounds plus a border—an ideal beginner granny square.
About this pattern
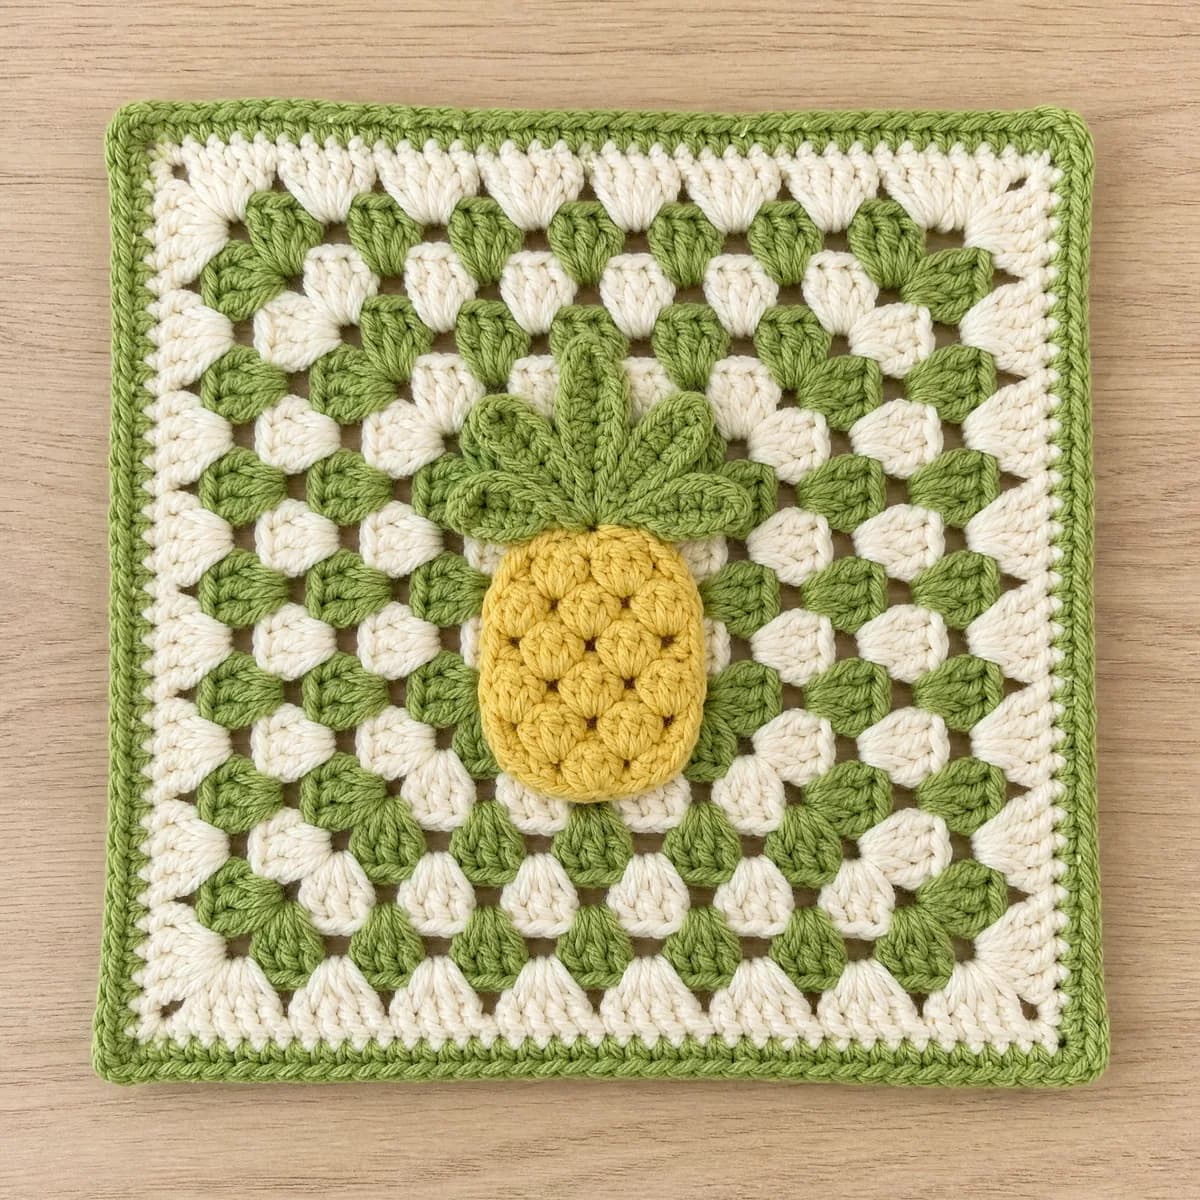
The Sunny Pineapple Granny Square starts life as a classic granny square worked flat in the round, then gets its personality from a sweet pineapple appliqué—Body, Center Leaf, and two Side Leaves—stitched separately in leaf green and golden yellow, then sewn onto the finished background. It's the kind of square that makes you smile every time you spot it in a stack, since the fruity little motif turns an ordinary granny into a tiny piece of sunshine.
You'll work double crochet corners and chain spaces the whole way through, building up from 12 stitches in round one to 60 by round five, then finishing with an 88-stitch single crochet border that squares off every edge. Because every round uses the same rhythm—corner, chain-1 spaces, groups of three double crochets—it's a forgiving pattern for anyone who has made a handful of granny squares before and wants to try a simple appliqué for the first time.
Once assembled, the square measures about 7 by 7 inches, with the golden pineapple body cross-hatched in chain spaces and its leafy crown fanning out in leaf green against the cream background. Stitch up a stack of them for a cheerful baby blanket, a set of coordinating placemats, or scatter a few as accent squares in a bigger cream-and-green throw.
Variations
Idea 1
If sunny yellow isn't your palette, this design flexes easily—try a coral or blush body with sage leaves for a softer look, or deep amber and forest green for something richer and more autumnal. Swapping worsted for a lighter DK yarn with a smaller hook gives you a daintier square perfect for coasters or a delicate baby blanket, while moving up to chunky yarn and a bigger hook turns the same pattern into an oversized statement square for a lap blanket in just a few rounds. You could also skip the appliqué colors entirely and work the whole background in one cream shade for a subtler, tone-on-tone version, then add the pineapple in a single accent color for a cleaner, more modern finish.
Idea 2
I designed this square on a morning when I wanted something that felt playful without being fussy, and the little pineapple appliqué turned out to be exactly that—simple shapes, sewn on at the end, that instantly read as fruit the moment you step back and squint. I love that the background rounds are pure classic granny square, so if you've made even one before, you already know the rhythm in your hands. What sold me on it, though, is how the golden body catches the light differently from the cream border, giving the whole thing a little glow. It's become one of my go-to squares whenever I want a project that feels a bit special but never stops being relaxing.
Common mistakes
Losing track of corner spaces
It's easy to stitch into the wrong chain space once the square grows past round three. Slip a stitch marker into each ch-2 corner as you finish a round so you always know exactly where to begin the next one.
Pulling the magic ring too loose
A loose starting ring leaves a visible gap in the very center of your pineapple body. Give the tail a firm tug once your first round of stitches locks the ring closed, then tug again before weaving in the end.
Mismatching corner stitch counts
Adding an extra stitch or missing one in a corner group throws off every round after it. Count your stitches between corners before joining each round, and recount if your square starts looking lopsided.
Sewing the appliqué on crooked
Stitching the pineapple pieces onto the background without checking placement first can leave it looking off-center. Pin the Body, Center Leaf, and Side Leaves in place and step back to check the balance before you sew a single stitch.
Materials & abbreviations
Materials
- Worsted-weight yarn in 3 colors (cream, leaf green, golden yellow) — about 25–40 g total per square
- 5.0 mm crochet hook
- Yarn needle for weaving in ends
- Scissors
Abbreviations
- ch
- chain
- dc
- double crochet
- sc
- single crochet
- sl st
- slip stitch
- sp
- space
- st(s)
- stitch(es)
- rnd
- round
- MR
- magic ring
Main pattern
The Background Square — Round 1
With cream, in a magic ring: ch 3, 2 dc, ch 2, [3 dc, ch 2] 3 times; sl st to top of ch-3 to join (12)
- Using cream yarn, in a magic ring: make 3 chain stitches, 2 double crochet, make 2 chain stitches, [3 double crochet, make 2 chain stitches] 3 times; slip stitch to top of ch-3 to join.
Tip Work the plain background square first — the sunny pineapple pieces are sewn on at the end. Every count below is math-verified.
The Background Square — Round 2
sl st to corner sp, ch 3, 2 dc, ch 2, 3 dc in same corner, ch 1, [(3 dc, ch 2, 3 dc) in corner sp, ch 1, ] 3 times; sl st to join (24)
- Slip stitch to corner space, make 3 chain stitches, 2 double crochet, make 2 chain stitches, 3 double crochet in same corner, make 1 chain stitch, [(3 double crochet, make 2 chain stitches, 3 double crochet) in corner space, make 1 chain stitch, ] 3 times; slip stitch to join.
The Background Square — Round 3
With leaf green, sl st to corner sp, ch 3, 2 dc, ch 2, 3 dc in same corner, ch 1, 3 dc, ch 1, [(3 dc, ch 2, 3 dc) in corner sp, ch 1, 3 dc, ch 1, ] 3 times; sl st to join (36)
- Using leaf green yarn, slip stitch to corner space, make 3 chain stitches, 2 double crochet, make 2 chain stitches, 3 double crochet in same corner, make 1 chain stitch, 3 double crochet, make 1 chain stitch, [(3 double crochet, make 2 chain stitches, 3 double crochet) in corner space, make 1 chain stitch, 3 double crochet, make 1 chain stitch, ] 3 times; slip stitch to join.
The Background Square — Round 4
sl st to corner sp, ch 3, 2 dc, ch 2, 3 dc in same corner, ch 1, 3 dc, ch 1, 3 dc, ch 1, [(3 dc, ch 2, 3 dc) in corner sp, ch 1, 3 dc, ch 1, 3 dc, ch 1, ] 3 times; sl st to join (48)
The Background Square — Round 5
With cream, sl st to corner sp, ch 3, 2 dc, ch 2, 3 dc in same corner, ch 1, 3 dc, ch 1, 3 dc, ch 1, 3 dc, ch 1, [(3 dc, ch 2, 3 dc) in corner sp, ch 1, 3 dc, ch 1, 3 dc, ch 1, 3 dc, ch 1, ] 3 times; sl st to join (60)
The Background Square — Border
sl st into the corner ch-2 sp, ch 1, [3 sc in the corner sp, (sc in next 3 sts, sc in next sp) 4 times, sc in next 3 sts] 4 times; sl st to the first sc (88)
- Slip stitch into the corner ch-2 space, make 1 chain stitch, [3 single crochet in the corner space, (single crochet in next 3 stitches, single crochet in next space) 4 times, single crochet in next 3 stitches] 4 times; slip stitch to the first single crochet.
The Background Square — Additional guidance
Slip stitch to corner space, make 3 chain stitches, 2 double crochet, make 2 chain stitches, 3 double crochet in same corner, make 1 chain stitch, 3 double crochet, make 1 chain stitch, 3 double crochet, make 1 chain stitch, [(3 double crochet, make 2 chain stitches, 3 double crochet) in corner space, make 1 chain stitch, 3 double crochet, make 1 chain stitch, 3 double crochet, make 1 chain stitch, ] 3 times; slip stitch to join.
The Background Square — Additional guidance
Using cream yarn, slip stitch to corner space, make 3 chain stitches, 2 double crochet, make 2 chain stitches, 3 double crochet in same corner, make 1 chain stitch, 3 double crochet, make 1 chain stitch, 3 double crochet, make 1 chain stitch, 3 double crochet, make 1 chain stitch, [(3 double crochet, make 2 chain stitches, 3 double crochet) in corner space, make 1 chain stitch, 3 double crochet, make 1 chain stitch, 3 double crochet, make 1 chain stitch, 3 double crochet, make 1 chain stitch, ] 3 times; slip stitch to join.
The Body — Round 1
6 sc in a magic ring (6)
Tip Worked in golden yellow. Leave a long tail for sewing.
The Body — Round 2
[inc] repeat 6 times (12)
The Body — Round 3
[sc, inc] repeat 6 times (18)
The Body — Round 4
[sc in next 2 sts, inc] repeat 6 times (24)
The Body — Round 5
sc in next 24 sts (24)
The Body — Round 6
[sc in next 2 sts, dec] repeat 6 times (18)
The Center Leaf — Round 1
ch 5, sl st in 2nd ch from hook, sc in next ch, hdc in next ch, dc in next ch (3)
Tip Worked in leaf green. Leave a long tail for sewing.
The Side Leaf Left — Round 1
ch 5, sl st in 2nd ch from hook, sc in next ch, hdc in next ch, dc in next ch (3)
Tip Worked in leaf green. Leave a long tail for sewing.
The Side Leaf Right — Round 1
ch 5, sl st in 2nd ch from hook, sc in next ch, hdc in next ch, dc in next ch (3)
Tip Worked in leaf green. Leave a long tail for sewing.
Assembly — Bringing It Together — Step 1
Step 1: Pin the Body centered on the background square, tapered Rnd 6 edge facing up toward the top of the square, wider Rnd 4/5 bulge sitting in the lower-middle.
Assembly — Bringing It Together — Step 2
Step 2: Whip stitch the Body's outer edge to the background square all the way around, keeping it flat (no stuffing).
Assembly — Bringing It Together — Step 3
Step 3: Fan the leaves above the Body's top edge like a crown: pin the Center Leaf pointing straight up, then the Side Leaf Left and Side Leaf Right angled outward about 30 degrees on either side, tips just touching.
Assembly — Bringing It Together — Step 4
Step 4: Sew the chain-edge base of each leaf to the top of the Body and to the background square, overlapping the leaf bases slightly so no gap shows.
Assembly — Bringing It Together — Step 5
Step 5: Work the cream cross-hatch embroidery over the Body once all pieces are secured, then weave in all ends on the wrong side.
Assembly — Bringing It Together — Embroidery
With cream, work a set of diagonal straight stitches across the Body running from lower-left to upper-right, spaced evenly to suggest the pineapple's woven skin texture
Assembly — Bringing It Together — Embroidery
With cream, work a second set of diagonal straight stitches crossing the first (lower-right to upper-left), forming a diamond cross-hatch over the golden yellow Body
Assembly — Bringing It Together — Embroidery
Optionally add one tiny cream straight stitch inside a few of the diamonds as a highlight fleck
Important notes
Gauge: the finished square is about 7 x 7 inches in Worsted weight yarn with a 5.0 mm hook. Tight crocheters can go up half a hook size; loose ones down half.
Color plan: the sample uses cream, leaf green, golden yellow in round order — change colors with a slip-stitch join in the first stitch of the new round.
Weave in your color-change tails as you go rather than saving them all for the end—it keeps the back of your square tidy and makes the final finishing pass much faster.
Block your finished square lightly with a spritz of water and a press under a towel; it squares up the corners and helps the pineapple appliqué sit flatter against the background.
Frequently asked questions
This is a beginner-friendly pattern built on classic granny square stitches—double crochet, chain spaces, and simple corners. If you've completed even one or two granny squares before, you'll pick up the rhythm quickly.
Not really—the pineapple pieces are simple crocheted shapes that you tack on with a few whip stitches once the background square is finished. No special sewing skills are required, just a yarn needle and a little patience.
Since this pattern uses worsted weight yarn across three colors—cream, leaf green, and golden yellow—a small amount of each is enough for one square. Keep partial skeins on hand if you're planning to make several.
You can, though a 5.0 mm hook with worsted yarn gives you the gauge this pattern is designed around. Sizing up or down will change your finished measurements, so swatch a square first if you want a specific size.
At about 7 by 7 inches, it's a lovely size for joining into a baby blanket, a set of pillow covers, or a run of coordinating placemats. A handful scattered through a bigger cream-toned blanket also makes a sweet accent.