Sandy Scallop Shell Granny Square — A Beginner Shell Appliqué
Crochet the Sandy Scallop Shell Granny Square: 5 verified rounds in ivory, dusty blue, sand, blush and cream, plus a sewn-on shell. Beginner friendly.
About this pattern
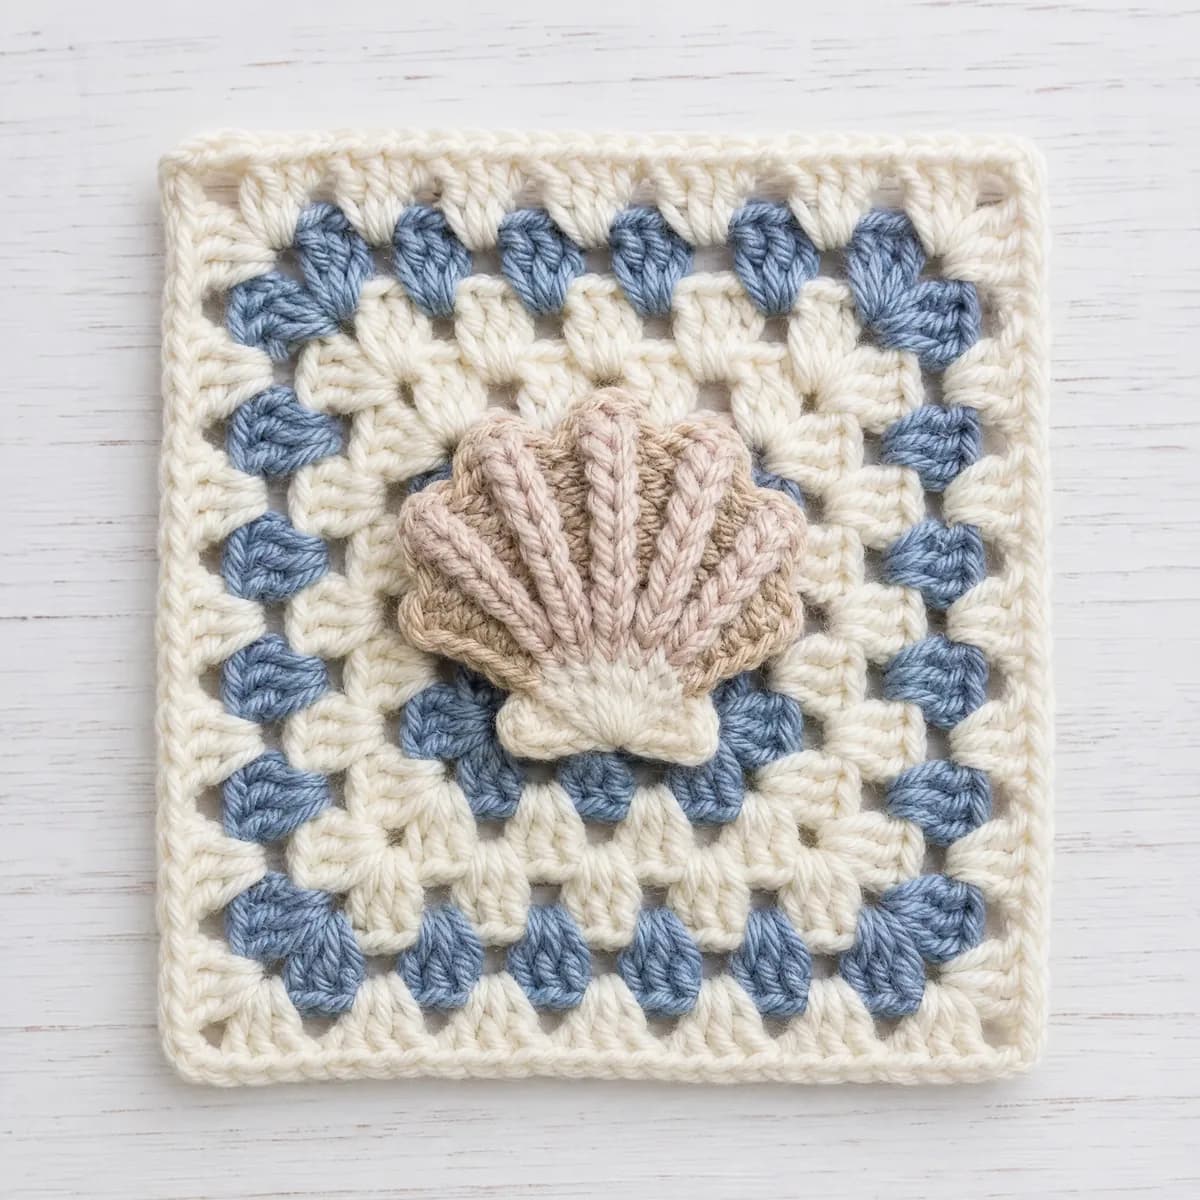
The Sandy Scallop Shell Granny Square starts out as a classic four-round granny base in a soft, sandy-toned palette, but the real charm shows up once the base is done. A tiny Sandy Scallop Shell — built from three small pieces I call the Shell Fan, the Shell Overlay, and the Hinge Dot — gets stitched up on its own and then sewn onto one corner of the square, like something that washed up and settled there on purpose.
Every round uses the same comfortable double crochet grouping you'd expect from a traditional granny square, so if you've made one before, this one will feel instantly familiar. The shell appliqué adds one new skill — sewing a finished piece neatly onto a background — which makes this a lovely next project for a beginner who's ready to move past the basic square and try a bit of finishing work.
Finished, the square measures about 6 by 6 inches, with the shell sitting quietly against ivory, dusty blue, sand, blush, and cream. It's a sweet one to make in a stack for a beach-toned throw, to scatter across a plain blanket as an accent square, or to finish on its own as a little coaster or hot pad for a sunroom shelf.
Variations
Idea 1
This square is easy to make your own. Swap dusty blue for a soft seafoam or a warm coral and the whole shell mood shifts from calm morning beach to bright afternoon one. If you want a plainer background, work all four base rounds in a single ivory or cream and let the shell appliqué carry all the color and contrast on its own. A finer cotton yarn with a smaller hook shrinks the shell down into a delicate brooch or bag charm, while a bulkier yarn puffs the whole motif up for a statement pillow. You can also finish the border round in whatever shade ties your other squares together.
Idea 2
I fell for this one the moment the little shell came together. There's something so satisfying about building a plain, honest granny square in soft ivory and dusty blue, then setting it aside to fuss over a tiny separate piece — the Shell Fan, the Overlay, that one perfect Hinge Dot — before sewing the whole sandy little bundle onto a corner. It feels like two small projects in one evening. The colors do the real work here: sand and blush layered close together read like light catching the ridges of a real shell. I love handing this square to anyone who says granny squares are all the same, because this one clearly isn't.
Common mistakes
Losing the corner ch-2 spaces
Work every stitch group directly into the ch-2 space, not around the whole chain, or the square will curl instead of lying flat.
Sewing the shell on crooked
Pin the Shell Fan and Overlay in place first and step back to check the angle before you take a single stitch.
Skipping the color-change tails
Leave a few extra inches on every color change so you have something to weave in later instead of a knot working loose.
Crowding the Hinge Dot
Keep the Hinge Dot small and centered where the shell pieces overlap — it's a quiet accent, not a bulky lump under the fan.
Materials & abbreviations
Materials
- Worsted-weight yarn in 5 colors (ivory, dusty blue, sand, blush, cream) — about 25–40 g total per square
- 5.0 mm crochet hook
- Yarn needle for weaving in ends
- Scissors
Abbreviations
- ch
- chain
- dc
- double crochet
- sc
- single crochet
- sl st
- slip stitch
- sp
- space
- st(s)
- stitch(es)
- rnd
- round
- MR
- magic ring
Main pattern
The Background Square — Round 1
With ivory, in a magic ring: ch 3, 2 dc, ch 2, [3 dc, ch 2] 3 times; sl st to top of ch-3 to join (12)
- Using ivory yarn, in a magic ring: make 3 chain stitches, 2 double crochet, make 2 chain stitches, [3 double crochet, make 2 chain stitches] 3 times; slip stitch to top of ch-3 to join.
Tip Work the plain background square first — the sandy scallop shell pieces are sewn on at the end. Every count below is math-verified.
The Background Square — Round 2
sl st to corner sp, ch 3, 2 dc, ch 2, 3 dc in same corner, ch 1, [(3 dc, ch 2, 3 dc) in corner sp, ch 1, ] 3 times; sl st to join (24)
- Slip stitch to corner space, make 3 chain stitches, 2 double crochet, make 2 chain stitches, 3 double crochet in same corner, make 1 chain stitch, [(3 double crochet, make 2 chain stitches, 3 double crochet) in corner space, make 1 chain stitch, ] 3 times; slip stitch to join.
The Background Square — Round 3
With dusty blue, sl st to corner sp, ch 3, 2 dc, ch 2, 3 dc in same corner, ch 1, 3 dc, ch 1, [(3 dc, ch 2, 3 dc) in corner sp, ch 1, 3 dc, ch 1, ] 3 times; sl st to join (36)
- Using dusty blue yarn, slip stitch to corner space, make 3 chain stitches, 2 double crochet, make 2 chain stitches, 3 double crochet in same corner, make 1 chain stitch, 3 double crochet, make 1 chain stitch, [(3 double crochet, make 2 chain stitches, 3 double crochet) in corner space, make 1 chain stitch, 3 double crochet, make 1 chain stitch, ] 3 times; slip stitch to join.
The Background Square — Round 4
sl st to corner sp, ch 3, 2 dc, ch 2, 3 dc in same corner, ch 1, 3 dc, ch 1, 3 dc, ch 1, [(3 dc, ch 2, 3 dc) in corner sp, ch 1, 3 dc, ch 1, 3 dc, ch 1, ] 3 times; sl st to join (48)
The Background Square — Border
With ivory, sl st into the corner ch-2 sp, ch 1, [3 sc in the corner sp, (sc in next 3 sts, sc in next sp) 3 times, sc in next 3 sts] 4 times; sl st to the first sc (72)
- Using ivory yarn, slip stitch into the corner ch-2 space, make 1 chain stitch, [3 single crochet in the corner space, (single crochet in next 3 stitches, single crochet in next space) 3 times, single crochet in next 3 stitches] 4 times; slip stitch to the first single crochet.
The Background Square — Additional guidance
Slip stitch to corner space, make 3 chain stitches, 2 double crochet, make 2 chain stitches, 3 double crochet in same corner, make 1 chain stitch, 3 double crochet, make 1 chain stitch, 3 double crochet, make 1 chain stitch, [(3 double crochet, make 2 chain stitches, 3 double crochet) in corner space, make 1 chain stitch, 3 double crochet, make 1 chain stitch, 3 double crochet, make 1 chain stitch, ] 3 times; slip stitch to join.
The Shell Fan — Round 1
ch 7, sc in 2nd ch from hook, sc in next 5 sts (6)
Tip Worked in sand. Leave a long tail for sewing.
The Shell Fan — Round 2
ch 1, turn, inc in first st, sc in next 4 sts, inc in last st (8)
The Shell Fan — Round 3
ch 1, turn, inc in first st, sc in next 6 sts, inc in last st (10)
The Shell Fan — Round 4
ch 1, turn, inc in first st, sc in next 8 sts, inc in last st (12)
The Shell Overlay — Round 1
ch 5, sc in 2nd ch from hook, sc in next 3 sts (4)
Tip Worked in blush. Leave a long tail for sewing.
The Shell Overlay — Round 2
ch 1, turn, inc in first st, sc in next 2 sts, inc in last st (6)
The Shell Overlay — Round 3
ch 1, turn, inc in first st, sc in next 4 sts, inc in last st (8)
The Hinge Dot — Round 1
6 sc in a magic ring (6)
Tip Worked in cream. Leave a long tail for sewing.
Assembly — Bringing It Together — Step 1
Pin the Shell Fan (sand) onto the background square just off-center, narrow foundation-chain edge pointing toward the bottom so the wide row-4 edge fans upward like an open scallop shell
Assembly — Bringing It Together — Step 2
Sew the Shell Fan down around its outer curve and sides with matching sand thread, leaving the fan's top edge slightly loose for a bit of dimension
Assembly — Bringing It Together — Step 3
Layer the Shell Overlay (blush) on top of the Shell Fan, aligning its narrow foundation edge with the same bottom point, and sew it in place around its edges with blush thread
Assembly — Bringing It Together — Step 4
Sew the Hinge Dot (cream) directly over the point where the two fans meet at the bottom, covering the join and forming the shell's hinge
Assembly — Bringing It Together — Step 5
Work the embroidered ridge lines from the Hinge Dot up through both layered fans to finish the shell's fluted texture
Assembly — Bringing It Together — Embroidery
With cream thread, work 4-5 short straight stitches fanning out from the Hinge Dot up to the top curved edge of the Shell Fan, like the ridge lines of a real scallop shell
Assembly — Bringing It Together — Embroidery
Add 2-3 tiny straight stitches along the top edge of the Shell Overlay in sand thread to echo the ridges on the smaller layer
Important notes
Gauge: the finished square is about 6 x 6 inches in Worsted weight yarn with a 5.0 mm hook. Tight crocheters can go up half a hook size; loose ones down half.
Color plan: the sample uses ivory, dusty blue, sand, blush, cream in round order — change colors with a slip-stitch join in the first stitch of the new round.
Block the background square with a light steam before sewing on the shell so the appliqué sits on a flat, even surface.
Weave in all your ivory and dusty blue tails on the wrong side before you start sewing, so the finished piece stays tidy front and back.
Frequently asked questions
This pattern uses a worsted weight yarn with a 5.0 mm hook, which is a comfortable, easy-to-find combination for a beginner square. Any worsted weight yarn you love in these five shades will work beautifully.
Not really — the shell pieces use the same basic stitches as the background rounds, just worked separately and then sewn on with a yarn needle. If you can already crochet a granny square, you have everything you need.
It blocks out to about 6 by 6 inches, which is a friendly size for joining into a blanket or using on its own. A light steam block will help it hold that shape.
Absolutely — the five-color sequence is really about contrast, so any palette that moves from a light background to a deeper accent shade will show off the shell shaping. Try warm sand tones or cool seaside blues depending on the mood you want.
Pin the appliqué pieces where you want them, check the placement in good light, then sew around the edges with a yarn needle and a length of matching yarn. Weave in the sewing tail the same way you would any other yarn end.