Compass Star Granny Square — Free 4-Round Puff Stitch Crochet Pattern
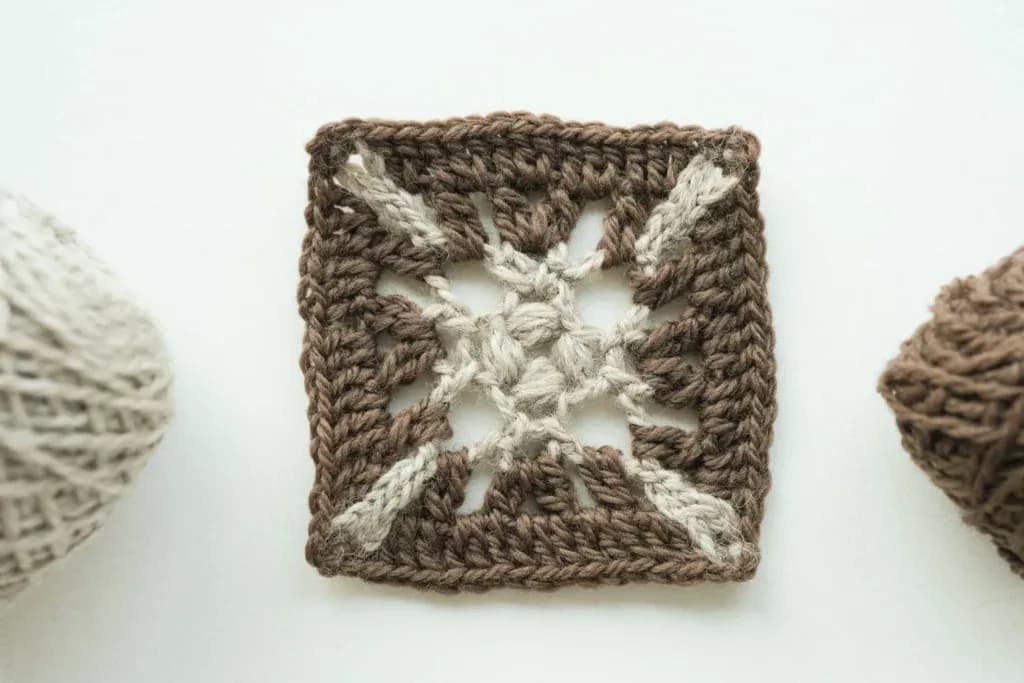
The Compass Star Granny Square is a small, graphic motif built around a raised puff-stitch center and four dramatic chain points. Long ch-16 sections extend outward like the cardinal points of a compass, while picot-style chain spaces and a contrasting square background give the finished motif an ai
About this pattern
The Compass Star Granny Square is constructed over just four rounds, but each round performs a very different job. Round 1 creates a compact center of four raised half-double-crochet puffs, all worked into the same third loop of the starting chain.
Round 2 adds the most recognizable feature of the design. Four long ch-16 sections are folded back and slip stitched into their own chains, creating pointed arms that resemble the cardinal directions of a compass rose. Smaller ch-4 loops between the points add openness around the center.
Round 3 changes color and begins filling the areas surrounding those chain points with 2-dc bobbles and ch-2 spaces. The round also attaches to the star points so the long chains remain integrated into the square rather than floating freely.
Round 4 completes the transformation into a granny-square shape. The final motif measures approximately 3.35 inches square and combines a dense textured center with much lighter chain sections, giving it a distinctive contrast between solid and open crochet.
The Compass Star Granny Square is a small, graphic motif built around a raised puff-stitch center and four dramatic chain points. Long ch-16 sections extend outward like the cardinal points of a compass, while picot-style chain spaces and a contrasting square background give the finished motif an airy geometric look.
This four-round pattern is best suited to confident beginners or intermediate crocheters who are comfortable with puff stitches, bobble-style stitches, working into the third loop of a chain, joining new yarn, and following shaped rounds. The finished square can be used for blankets, cushion panels, coasters, decorative motifs, or nautical-inspired crochet projects.
Variations
Nautical Compass Square
Use a deep navy center and crisp white star points and background. The strong contrast emphasizes the compass-rose shape and works especially well for nautical blankets or cushion covers.
Modern Two-Color Square
Try mustard yellow with charcoal gray or another high-contrast modern palette. The geometric construction works well with simple, bold colors.
Smaller or Larger Yarn Weight
You can make the motif with a lighter or heavier yarn while keeping the same written construction. Choose a hook suitable for the yarn and expect the finished size to change. Make a sample before beginning a project that requires multiple matching squares.
Multi-Square Project
Join several blocked motifs into a blanket, cushion panel, wall hanging, or decorative table piece. Block every square to matching dimensions before assembly so the long chain points remain evenly aligned.
Common mistakes
Working Round 1 Into the Wrong Loop
The puff-stitch center may stretch, twist, or become oval instead of staying compact and symmetrical.
Try this**How to fix it:** Before making the first puff, locate and mark the third loop of the very first chain. Work all four puff stitches into that same marked loop.
Making Loose Puff Stitches
The center looks floppy and uneven instead of forming a compact raised cluster.
Try this**How to fix it:** Pull all three puff loops to the same height and keep the hook level. When all seven loops are on the hook, yarn over and pull through firmly enough to close the puff without adding an extra closing chain.
Counting the Star Point From the Hook
The long ch-16 section folds in the wrong place and may look like a loose loop instead of a pointed arm.
Try this**How to fix it:** Count three chains from the **base** of the ch-16 where it begins near the center. Work the slip stitch into the third loop of that chain.
Forgetting the Ch 3 After a Point
The next section may pull tightly against the previous point, causing the motif to cup or lose symmetry.
Try this**How to fix it:** Use the sequence: **picot, ch 16, slip stitch, ch 3** for every point.
Attaching Round 3 at the Wrong Height
One compass arm may pull higher or lower than the others, making the star look twisted.
Try this**How to fix it:** Make sure every Round 3 slip stitch is attached at the same relative height on each long Round 2 chain. Because the exact attachment chain is not supplied in the written source, verify the placement with the original visual reference.
Materials & abbreviations
Materials
- Worsted-weight yarn in 2 colors
- Crochet hook suitable for the yarn
- Darning or yarn needle
- Scissors
- Stitch marker or additional darning needle for marking third loops
Abbreviations
- **ch**
- Chain
- **sc**
- Single crochet
- **hdc**
- Half double crochet
- **dc**
- Double crochet
- **sl st**
- Slip stitch
- **st**
- Stitch
- **ch**
- sp — Chain space
- **inc**
- Increase
- **3**
- hdc-puff — 3-half-double-crochet puff stitch
- **2**
- dc-bo — 2-double-crochet bobble
- **rep**
- Repeat
Main pattern
Round 1 — Puff Stitch Center
**Pattern:** Begin with a slip knot. Ch 4. Locate the third loop of the first ch and mark it if needed. Work a **3-hdc-puff** into the third loop of the first ch. Work: **[ch 4, 3-hdc-puff in the third loop of the first ch] 3 times** Sl st to the top of the first puff.
Round 2 — creates the raised center of the compass motif.
**Pattern:** After chaining 4, locate the back bump or third loop of the very first chain. This same loop is used for all four puff stitches, so marking it before beginning makes it much easier to find. To form each 3-hdc puff, yarn over, insert the hook into the marked loop, yarn over, and pull up a loop. Repeat this process three times so you have seven loops on the hook, then yarn over and pull through all seven loops. The source does not add an extra closing chain after the puff. Chain 4 between each puff and continue working every puff into the same marked third loop of the first chain. When complete, you should have four raised puff stitches separated by four ch-4 spaces.
Round 3 — Create the Four Compass Points
**Pattern:** Sl st to the next ch-4 sp. Ch 1 as a standing st. Sc in the same ch-sp. Ch 4. Sc in the same ch-sp. Ch 16. Sl st into the third loop of the 3rd ch counted from the beginning of the ch-16. Ch 3. Work: **[sc, ch 4, sc in next ch-sp, ch 16, sl st into the third loop of the 3rd ch counted from the beginning of the ch-16, ch 3] 3 times** Sl st to the first sc. Fasten off. **Step-by-step:** Each ch-4 space from Round 1 creates one section of the star. Begin by slip stitching into the next ch-4 space. Work sc, ch 4, sc into that same space. This creates a small decorative loop at the base of the point. Next, chain 16. This long chain becomes one of the dramatic compass arms. The unusual part is how the point is closed. Count three chains from the **beginning of the ch-16**, near its base, rather than counting backward from the hook. Turn the chain slightly so you can see the third loops along the back. Insert the hook into the third loop of that third chain and make a slip stitch. This folds the long chain back on itself and forms a pointed arm. Ch 3 to return toward the central structure, then repeat the same process in the next ch-4 space. When complete, you should have four evenly positioned long star points.
Round 4 — Build the Bobble Background
**Pattern:** Join the second color in any ch-4 sp. Ch 2, counting as an incomplete dc. Work another incomplete dc in the same ch-sp to form the first 2-dc-bo. Ch 2. Work another 2-dc-bo in the same ch-sp. Ch 2. Work 2-dc-bo, ch 2 in the next ch-sp. Sl st into the third loop of the chain from Round 2 at the appropriate height. Ch 2. Work 2-dc-bo, ch 2 in the next ch-sp. Continue with: **[2-dc-bo, ch 2, 2-dc-bo, ch 2 in next ch-sp, 2-dc-bo, ch 2 in next ch-sp, sl st into the third loop of the chain from Round 2 at the appropriate height, ch 2, 2-dc-bo, ch 2 in next ch-sp] 3 times** Sl st to the top of the first bobble. **Pattern note:** The source instructs you to slip stitch into the third loop of a Round 2 chain "at the appropriate height" but does not identify the exact chain number or position. This attachment point should be verified against the original visual instructions before publication. **Step-by-step:** Round 3 begins filling the open areas around the star points and creates the foundation for the final square. Join the contrasting yarn into any ch-4 space. The beginning ch 2 acts as the first incomplete double crochet of the first bobble. Work another incomplete double crochet into the same space and complete the bobble as directed by the stitch construction. The 2-dc bobbles are separated by ch-2 spaces. These chain spaces will be used extensively in Round 4. At specific points around the round, the fabric is anchored to one of the long chain arms from Round 2 with a slip stitch worked into a third loop of that chain. Because the source does not state the exact chain number used for these attachment points, confirm their placement visually before publishing or reproducing the pattern commercially.
Round 5 — Turn the Star Into a Square
**Pattern:** Ch 3, counting as dc. Dc inc in next ch-sp. Work: **[dc, dc inc in next ch-sp] 2 times** In the next ch-sp work: **sc, ch 2, sc** This forms the first corner. Then work: **dc inc in next ch-sp, dc, dc inc in next ch-sp** For the remaining sides, work: **[dc, dc inc in next ch-sp 3 times, sc, ch 2, sc in next ch-sp, dc inc in next ch-sp, dc, dc inc in next ch-sp] 3 times** Sl st to the top of the beginning ch 3. Fasten off. **Pattern note:** The source writes the repeated side sequence in a compressed form. The instructions above preserve the stated stitch order, but the exact distribution of plain dc stitches versus ch-space increases should be checked against the original pattern images before publication.
Round 6 — turns the open star structure into a square.
**Pattern:** Begin with ch 3, which counts as the first double crochet. Most of the side shaping alternates regular double crochets with double-crochet increases worked into chain spaces. Each corner is formed with **sc, ch 2, sc** worked into the same chain space. Although single crochet is shorter than the surrounding double crochet stitches, the ch-2 opening establishes a clear corner position. Continue following the same side-and-corner structure around all four sides. When the round is complete, you should have four defined ch-2 corners surrounding the raised compass-star center.
Finishing
Fasten off the final yarn and weave all loose ends securely into the wrong side of the square.
Avoid weaving tails through the long chain points where they may become visible. Instead, secure them through the denser puff, bobble, or border stitches.
Gently block the finished square to approximately 3.35 × 3.35 inches.
Pin the four long compass points so they extend evenly outward and straighten the surrounding square border before allowing the piece to dry.
Important notes
**Mark the third loop before working Round 1.** — All four puff stitches are worked into the third loop of the first chain. Once the first puff is in place, that loop becomes much harder to identify.
**Keep all puff loops the same height.** — Pull each loop of the 3-hdc puff to approximately the same height. Uneven loops can make one puff taller or looser than the others.
**Count ch-16 from the base.** — When closing a compass point, locate the third chain by counting from the beginning of the ch-16 near the motif, not backward from the hook.
**Do not forget the ch 3 after each point.** — After slip stitching the ch-16 into its third chain, work ch 3 before beginning the next section. Missing these chains can cause the motif to cup or distort.
**Keep every long point the same length.** — Count each ch-16 carefully. Even a one-chain difference is noticeable in such a small geometric motif.
**Verify the Round 3 attachment points.** — The source does not specify exactly which chain of each long point receives the Round 3 slip stitch. Confirm this visually before publication.
Frequently asked questions
It is best suited to confident beginners or intermediate crocheters. The basic stitches are familiar, but the pattern requires careful third-loop placement, puff stitches, bobbles, long chain shaping, and unusual attachment points.
The third loop is the small bump along the back of a chain stitch. Turn the chain slightly away from the usual front-facing V shape and look for the ridge running along the back. The pattern uses this loop to create cleaner and more stable attachment points.
Check where the ch-16 section was slip stitched. The slip stitch should be made into the third loop of the third chain counted from the **beginning** of the ch-16. Counting from the hook changes the fold location dramatically.
The source construction uses ch 16 for every long point. Changing that number affects the shape and later attachment positions, so alterations should be tested carefully before using them in a finished project.
First check that every ch-16 point is followed by ch 3. Also verify that the ch-2 spaces, increases, and corner placements in Rounds 3 and 4 have all been worked as instructed.
Yes. Blocking helps straighten the long chain points, relax the puff and bobble stitches, and shape the outer border into a more accurate square.