Inset Mosaic Crochet Washcloth — Free Wildflower-Inspired Pattern
This square crochet washcloth combines simple single crochet with inset mosaic double crochet to create a crisp geometric colorwork design. The pattern is worked in turned rows, with pairs of rows alternating between two colors so the mosaic pattern develops without cutting the yarn after every colo
About this pattern
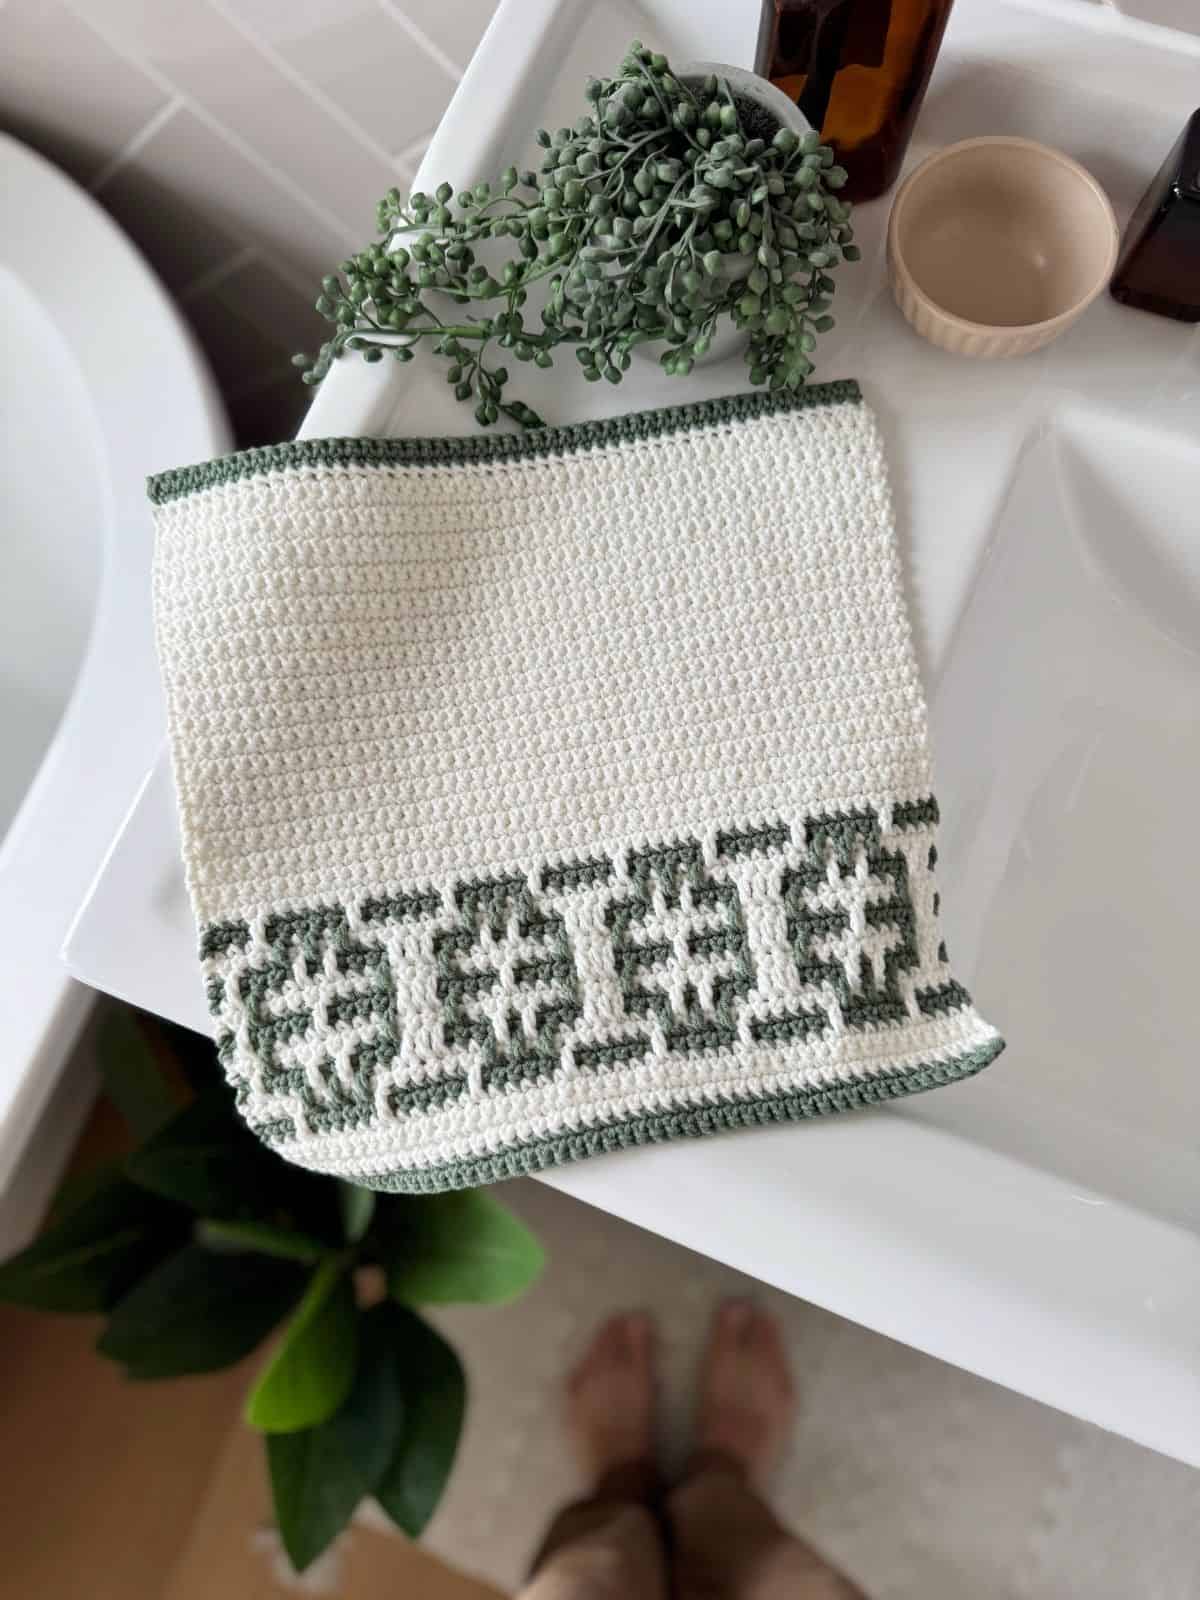
This washcloth is worked in turned rows and combines plain single crochet with inset mosaic crochet. The patterned section is created by working rows in pairs, with two rows of one color followed by two rows of another.
Unlike some mosaic techniques that require cutting the yarn after every row, this version allows the resting color to travel neatly up the back edge. Chain spaces are deliberately left in selected rows, then filled several rows later with Mosaic double crochet stitches worked into the empty stitches below.
The washcloth begins with 50 foundation single crochet stitches. The mosaic section is followed by a large plain single-crochet section, which balances the decorative colorwork and makes the finished piece practical for everyday use.
The sample measures approximately 10.5 inches square with a gauge of 19 stitches and 24 rows per 4 inches. The dense worsted-weight fabric makes the project suitable for washcloths, dishcloths, decorative cloths, and practice swatches for larger inset mosaic projects.
This square crochet washcloth combines simple single crochet with inset mosaic double crochet to create a crisp geometric colorwork design. The pattern is worked in turned rows, with pairs of rows alternating between two colors so the mosaic pattern develops without cutting the yarn after every color change.
It is best suited to intermediate crocheters or confident beginners who already understand single crochet and are ready to learn inset mosaic crochet. The finished washcloth measures approximately 10.5 × 10.5 inches and works well for bathroom sets, kitchen cloths, handmade gifts, or as a practice piece before beginning a larger mosaic blanket.
Variations
Different Two-Color Palette
Use any two contrasting worsted-weight colors. Strong contrast makes the geometric mosaic stitches easier to see, while two closely related shades produce a more subtle textured look.
Cotton Washcloth
Choose a worsted-weight cotton yarn for a highly absorbent washcloth. Make a gauge swatch first because different cotton yarns can produce a firmer fabric or a slightly different finished size.
Larger Mosaic Panel
The mosaic repeat can be incorporated into a larger rectangular project if the stitch multiple and edge stitches are maintained correctly. Keep the established mosaic repeat intact so the geometric design remains aligned.
Coordinating Washcloth Set
Use the same main color with several different accent colors to create a matching set. The consistent construction keeps the washcloths coordinated while allowing each mosaic section to have a different color combination.
Common mistakes
Working Mdc Into the Current Row
The long colored lines of the mosaic design do not appear and the stitch looks like an ordinary double crochet.
Try this**How to fix it:** Insert the hook into the indicated empty stitch three rows below. The Mdc should travel upward through the chain space above that stitch.
Losing Track of Row Pairs
Colors may change on the wrong side of the fabric, causing the mosaic design to shift or the carried yarn to appear in the wrong location.
Try this**How to fix it:** Remember that every mosaic row is part of a pair. Row "a" is worked on the RS and Row "b" on the WS. Change color only after completing the pair.
Crocheting Into a Stitch That Should Be Skipped
A future Mdc has no empty stitch to work into, so part of the geometric design disappears.
Try this**How to fix it:** Whenever the pattern says ch 1 and skip a stitch, leave that stitch completely unworked. The skipped stitch is deliberately reserved for a later Mosaic double crochet.
Miscounting the Repeat
The geometric pattern slowly shifts across the washcloth and the final repeat may no longer fit correctly.
Try this**How to fix it:** Count the stitches within each repeat before starting the next one. Pay particular attention to the longer groups of five or seven single crochets and to ch-2 spaces that skip two stitches.
Cutting Both Colors After Every Pair
You create many unnecessary yarn tails that need to be woven in later.
Try this**How to fix it:** Unless the pattern specifically tells you to break the yarn, leave the resting color attached and carry it neatly up the back edge.
Materials & abbreviations
Materials
- Worsted-weight category 4 yarn
- Approximately 85 yds of Color A
- Approximately 25 yds of Color B
- 3.5 mm crochet hook or size needed to obtain gauge
- Yarn needle
- Scissors
Abbreviations
- **ch**
- Chain
- **ch**
- sp — Chain space
- **sc**
- Single crochet
- **Mdc**
- Mosaic double crochet
- **Fsc**
- Foundation single crochet
- **sl st**
- Slip stitch
- **st**
- Stitch
- **sts**
- Stitches
- **sp**
- Space
- **rep**
- Repeat
- **RS**
- Right side
- **WS**
- Wrong side
Main pattern
Step 1 — Foundation Single Crochet
**Pattern:** Using Color A, work **Fsc 50**. Turn. **Step-by-step:** Foundation single crochet creates the starting chain and first row of single crochet at the same time. To make the first Fsc, ch 2 and insert the hook into the second chain from the hook. Yarn over and pull up a loop. Yarn over and pull through one loop to create the foundation chain portion of the stitch. Yarn over again and pull through both loops on the hook to complete the single crochet. For each following Fsc, insert the hook into the foundation chain portion of the previous stitch, pull up a loop, make the next foundation chain, then complete the single crochet. Continue until you have 50 foundation single crochet stitches. **Stitch count:** 50 stitches.
Row 2 — Setup Row
**Pattern:** Ch 1. Sc in each st across. Turn. **Step-by-step:** Chain 1 before beginning the row. The ch 1 does not count as a stitch. Work one single crochet into each of the 50 stitches across the foundation row. Turn your work when you reach the end.
Step 3 — How the Mosaic Rows Work
**Pattern:** The mosaic section is worked in paired rows: **Step-by-step:** Inset mosaic crochet creates the colorwork by deliberately leaving chain spaces in one pair of rows and filling selected spaces later with Mosaic double crochet. You will work two rows in one color, then two rows in the second color. When an Mdc is required, work it into the empty stitch three rows below rather than into the current row. The long double crochet rises through the chain space and creates the visible mosaic design on the right side.
Step 4 — Mosaic Double Crochet
**Pattern:** To work an Mdc: Yarn over. Insert the hook into the indicated empty st **3 rows below**. Yarn over and pull up a loop. Yarn over and pull through 2 loops. Yarn over and pull through the remaining 2 loops. **Step-by-step:** An Mdc is formed like a regular double crochet, but instead of inserting your hook into the current row, reach down into the empty stitch that was deliberately skipped three rows earlier. The tall stitch fills the chain space above it and creates one of the colored lines in the mosaic design. Always work the Mdc with the color currently in use.
Row 5 — a — First Mosaic Row
**Pattern:** Ch 1. Sc in each st across. Turn. **Step-by-step:** This is a plain single-crochet row that establishes the first half of the initial mosaic pair. Work evenly across all stitches and turn at the end.
Row 6 — b — Complete the First Pair
**Pattern:** Ch 1. Sc in each st across. Change color. Do not break Color A. Carry the unused yarn up the back of the work. Turn. **Step-by-step:** Work another complete single-crochet row. At the end of the row, change to the second color. Keep Color A attached rather than cutting it because it will be used again later. Carry the unused yarn neatly up the edge on the wrong side.
Row 7 — a — Create the First Open Spaces
**Pattern:** Ch 1. Sc in first st. Work: **[sc in next 2 sts, ch 1, sk next st, sc in next 5 sts, ch 1, sk next st, sc in next 3 sts]** Rep across to the last st. Sc in last st. Turn. **Step-by-step:** This row begins creating the empty spaces needed for future mosaic stitches. Whenever the pattern says ch 1 and skip the next stitch, do not work into that stitch. Chain once and move directly to the following stitch. Keep these skipped stitches visible because later Mdc stitches will be worked into them.
Row 8 — b — Offset the Chain Spaces
**Pattern:** Ch 1. Sc in first st. Work: **[sc in next 3 sts, ch 1, sk next st, sc in next 5 sts, ch 1, sk next st, sc in next 2 sts]** Rep across to the last st. Sc in last st. Change color. Turn. **Step-by-step:** This row creates another set of openings, but the stitch groups are shifted slightly compared with Row 2a. Follow the counts carefully so the spaces line up correctly with the later Mosaic double crochet stitches. Change color after finishing the row.
Row 9 — a — Add the First Mosaic Double Crochets
**Pattern:** Ch 1. Sc in first st. Work: **[sc in next 2 sts, Mdc in next st, ch 1, sk next st, sc in next st, ch 1, sk next st, ch 1, sk next st, Mdc in next st, sc in next 3 sts]** Rep across to the last st. Sc in last st. Turn. **Step-by-step:** This is the first row where the mosaic pattern begins to appear clearly. Work each Mdc into the corresponding empty stitch three rows below. Between the two Mosaic double crochets, maintain the chain spaces exactly as written. These new openings will be used by later rows.
Row 10 — b — Maintain the Mosaic Openings
**Pattern:** Ch 1. Sc in first st. Work: **[sc in next 4 sts, ch 1, sk next st, sc in next st, ch 1, sk next st, ch 1, sk next st, sc in next 3 sts]** Rep across to the last st. Sc in last st. Change color. Turn. **Step-by-step:** Row 3b contains no Mosaic double crochet stitches. Instead, it maintains the pattern of solid single crochet sections and chain spaces so the next color can continue building the design. Change color after the row.
Row 11 — a — Build the Geometric Pattern
**Pattern:** Ch 1. Sc in first st. Work: **[ch 1, sk next st, sc in next 2 sts, Mdc in next st, ch 1, sk next st, Mdc in next st, ch 1, sk next st, Mdc in next st, sc in next 2 sts, ch 2, sk next 2 sts]** Rep across to the last st. Sc in last st. Turn. **Step-by-step:** This row combines several Mosaic double crochets with both ch-1 and ch-2 spaces. The ch-2 section skips two stitches instead of one, creating a wider opening in the developing motif. Keep checking that every Mdc reaches into the correct empty stitch three rows below.
Row 12 — b — Prepare the Next Layer
**Pattern:** Ch 1. Sc in first st. Work: **[ch 2, sk next 2 sts, sc in next 2 sts, sc in next st, ch 1, sk next st, sc in next st, ch 1, sk next st, sc in next 3 sts, ch 1, sk next st]** Rep across to the last st. Sc in last st. Change color. Turn. **Step-by-step:** Row 4b mirrors the spacing from the previous row using single crochet and chains instead of long mosaic stitches. Pay special attention to the ch-2 spaces and make sure exactly two stitches are skipped beneath them.
Row 13 — a — Fill the Mosaic Spaces
**Pattern:** Ch 1. Sc in first st. Work: **[Mdc in next st, ch 1, sk next st, sc in next 2 sts, Mdc in next st, sc in next st, Mdc in next st, sc in next 2 sts, ch 1, sk next st, Mdc in next 2 sts]** Rep across to the last st. Sc in last st. Turn. **Step-by-step:** Several previously skipped stitches are filled with Mdc stitches in this row. The Mosaic double crochets create the long vertical sections of the geometric motif, while the new chain spaces prepare openings for later rows.
Row 14 — b — Plain Sections Between Openings
**Pattern:** Ch 1. Sc in first st. Work: **[sc in next 2 sts, ch 1, sk next st, sc in next 7 sts, ch 1, sk next st, sc in next st]** Rep across to the last st. Sc in last st. Change color. Turn. **Step-by-step:** This row contains longer runs of single crochet. Count the seven-stitch center section carefully. Accurate counting is important because these stitches determine where the next mosaic elements will fall.
Row 15 — a — Continue the Mosaic Design
**Pattern:** Ch 1. Sc in first st. Work: **[ch 1, sk next st, Mdc in next st, sc in next 3 sts, ch 1, sk next st, sc in next 3 sts, Mdc in next st, ch 2, sk next 2 sts]** Rep across to the last st. Sc in last st. Turn. **Step-by-step:** Work the Mdc stitches into their corresponding empty stitches three rows below. Keep the two groups of three single crochets even and maintain the wider ch-2 space at the end of each repeat.
Row 16 — b — Set Up the Next Pair
**Pattern:** Ch 1. Sc in first st. Work: **[ch 2, sk next 2 sts, sc in next 4 sts, ch 1, sk next st, sc in next 4 sts, ch 1, sk next st]** Rep across to the last st. Sc in last st. Change color. Turn. **Step-by-step:** This row is made from single crochet and chain spaces only. The groups of four single crochets help maintain the symmetry of the motif while the skipped stitches prepare for future Mosaic double crochets.
Row 17 — a — Repeat the Mosaic Structure
**Pattern:** Ch 1. Sc in first st. Work: **[Mdc in next st, ch 1, sk next st, sc in next 3 sts, Mdc in next st, sc in next 3 sts, ch 1, sk next st, Mdc in next 2 sts]** Rep across to the last st. Sc in last st. Turn. **Step-by-step:** This row adds another set of long mosaic stitches. Keep the two three-single-crochet sections equal so the geometric design remains centered within each repeat.
Row 18 — b — Maintain the Openings
**Pattern:** Ch 1. Sc in first st. Work: **[sc in next 2 sts, ch 1, sk next st, sc in next 7 sts, ch 1, sk next st, sc in next st]** Rep across to the last st. Sc in last st. Change color. Turn. **Step-by-step:** This row repeats the same spacing structure used earlier. Count the central seven single crochets carefully before making the next chain space.
Row 19 — a — Create the Center Openings
**Pattern:** Ch 1. Sc in first st. Work: **[ch 1, sk next st, Mdc in next st, sc in next 2 sts, ch 1, sk next st, sc in next st, ch 1, sk next st, sc in next 2 sts, Mdc in next st, ch 2, sk next 2 sts]** Rep across to the last st. Sc in last st. Turn. **Step-by-step:** This row introduces several chain spaces near the middle of each repeat. Those spaces help shape the central portion of the mosaic design. Work the two Mosaic double crochets carefully into the appropriate empty stitches three rows below.
Row 20 — b — Mirror the Spacing
**Pattern:** Ch 1. Sc in first st. Work: **[ch 2, sk next 2 sts, sc in next 3 sts, ch 1, sk next st, sc in next st, ch 1, sk next st, sc in next 3 sts, ch 1, sk next st]** Rep across to the last st. Sc in last st. Change color. Turn. **Step-by-step:** This row prepares the openings that will be filled in the next color pair. The two groups of three single crochets sit on either side of the center opening and help maintain symmetry.
Row 21 — a — Fill the Central Mosaic Details
**Pattern:** Ch 1. Sc in first st. Work: **[Mdc in next st, sc in next 2 sts, ch 1, sk next st, Mdc in next st, ch 1, sk next st, Mdc in next st, ch 1, sk next st, sc in next 2 sts, Mdc in next 2 sts]** Rep across to the last st. Sc in last st. Turn. **Step-by-step:** The previously created openings are now filled selectively with Mosaic double crochet. This is one of the more detailed rows in the motif, so work slowly and count each skipped stitch before placing the next Mdc.
Row 22 — b — Prepare the Closing Rows
**Pattern:** Ch 1. Sc in first st. Work: **[sc in next 4 sts, ch 1, sk next st, sc in next st, ch 1, sk next st, ch 1, sk next st, sc in next 3 sts]** Rep across to the last st. Sc in last st. Change color. Turn. **Step-by-step:** Row 9b returns to single crochet and chain spaces. The openings created here allow the final mosaic rows to bring the geometric design back toward a solid fabric.
Row 23 — a — Close the Mosaic Shape
**Pattern:** Ch 1. Sc in first st. Work: **[sc in next 2 sts, ch 1, sk next st, Mdc in next st, sc in next st, Mdc in next st, sc in next st, Mdc in next st, ch 1, sk next st, sc in next 3 sts]** Rep across to the last st. Sc in last st. Turn. **Step-by-step:** Three Mosaic double crochet stitches form the center of each repeat. The plain stitches and chain spaces on either side help narrow the mosaic section as it approaches the final rows.
Row 24 — b — Final Open-Space Row
**Pattern:** Ch 1. Sc in first st. Work: **[sc in next 3 sts, ch 1, sk next st, sc in next 5 sts, ch 1, sk next st, sc in next 2 sts]** Rep across to the last st. Sc in last st. Change color. Turn. **Step-by-step:** This is the last row containing skipped spaces before the mosaic section closes. Keep the five-single-crochet center section accurate so the final Mosaic double crochets align correctly.
Row 25 — a — Complete the Mosaic Motif
**Pattern:** Ch 1. Sc in first st. Work: **[sc in next 2 sts, Mdc in next st, sc in next 5 sts, Mdc in next st, sc in next 3 sts]** Rep across to the last st. Sc in last st. Turn. **Step-by-step:** The remaining open stitches from earlier rows are filled with Mosaic double crochet. There are no new chain spaces in this row, so the patterned section begins returning to a solid fabric.
Row 26 — b — Close the Mosaic Section
**Pattern:** Ch 1. Sc in each st across. Turn. **Step-by-step:** Finish the mosaic section with a complete row of single crochet. At this point, all of the main mosaic shaping is complete and you can continue with the plain washcloth section.
Step 27 — Plain Single Crochet Section
**Pattern:** Continue in the same color. Work **32 rows** of sc in each st across. Turn after every row. At the end of Row 32, change color. **Step-by-step:** The remainder of the main washcloth is intentionally simple so the mosaic panel remains the focal point. Work one single crochet into every stitch across each row. Continue for a total of 32 plain rows, turning after every row. Change to the contrast color at the end of Row 32.
Step 28 — Top Border
**Pattern:** Work 2 additional rows of sc in each st across. Turn after the first row. Break yarn at the end of the second row. **Step-by-step:** These two rows create a simple contrast border along the top of the washcloth. Keep the stitch count unchanged and fasten off after completing the second row.
Finishing
With the RS facing, join the yarn used for the mosaic section to the first foundation single crochet along the opposite edge.
Work 2 rows of sc evenly across this foundation edge.
Turn after the first row.
Break yarn after the second row.
Weave in all loose ends securely.
Gently block the washcloth to approximately 10.5 × 10.5 inches, shaping the edges into an even square.
Important notes
**The beginning ch 1 does not count as a stitch.** — Begin each row with ch 1, then work the first actual stitch into the first stitch of the previous row.
**Work every row as a turned row.** — Turn the fabric at the end of each row unless the instruction specifically tells you otherwise.
**Change colors after complete row pairs.** — Inset mosaic crochet is worked in pairs. Row "a" is the RS row and Row "b" is the WS row. Change color after the pair is complete.
**Do not cut the yarn at every mosaic color change.** — Carry the resting yarn neatly up the back edge until it is needed again.
**Work Mdc stitches three rows below.** — Insert the hook into the empty stitch directly below the appropriate chain space. Do not work the Mdc into the chain itself.
**Check your gauge before beginning.** — The source gauge is **19 stitches and 24 rows = 4 × 4 inches**. Adjust hook size if needed to achieve the intended finished dimensions.
Frequently asked questions
Inset mosaic crochet creates colorwork by leaving chain spaces in selected rows and later filling those spaces with long Mosaic double crochet stitches. The technique produces geometric color patterns while allowing the yarn colors to be carried between row pairs.
It is best suited to intermediate crocheters or confident beginners. You should already be comfortable with single crochet, turning rows, counting repeats, and changing yarn colors before learning the Mosaic double crochet technique.
No. During the mosaic section, the unused yarn can be carried up the back edge so it is ready when the color is needed again.
The most common causes are accidentally working into a stitch that should have been skipped, placing an Mdc into the wrong empty stitch, or losing track of the repeat. Check each chain space against the rows below before continuing.
Yes. Choose a category 4 yarn and make a gauge swatch before beginning. Adjust your hook size if necessary to stay close to the pattern gauge.
The sample measures approximately 10.5 × 10.5 inches. Your finished size may vary slightly depending on yarn choice, hook size, and individual tension.