Double Heart Granny Square — Free Textured Crochet Pattern
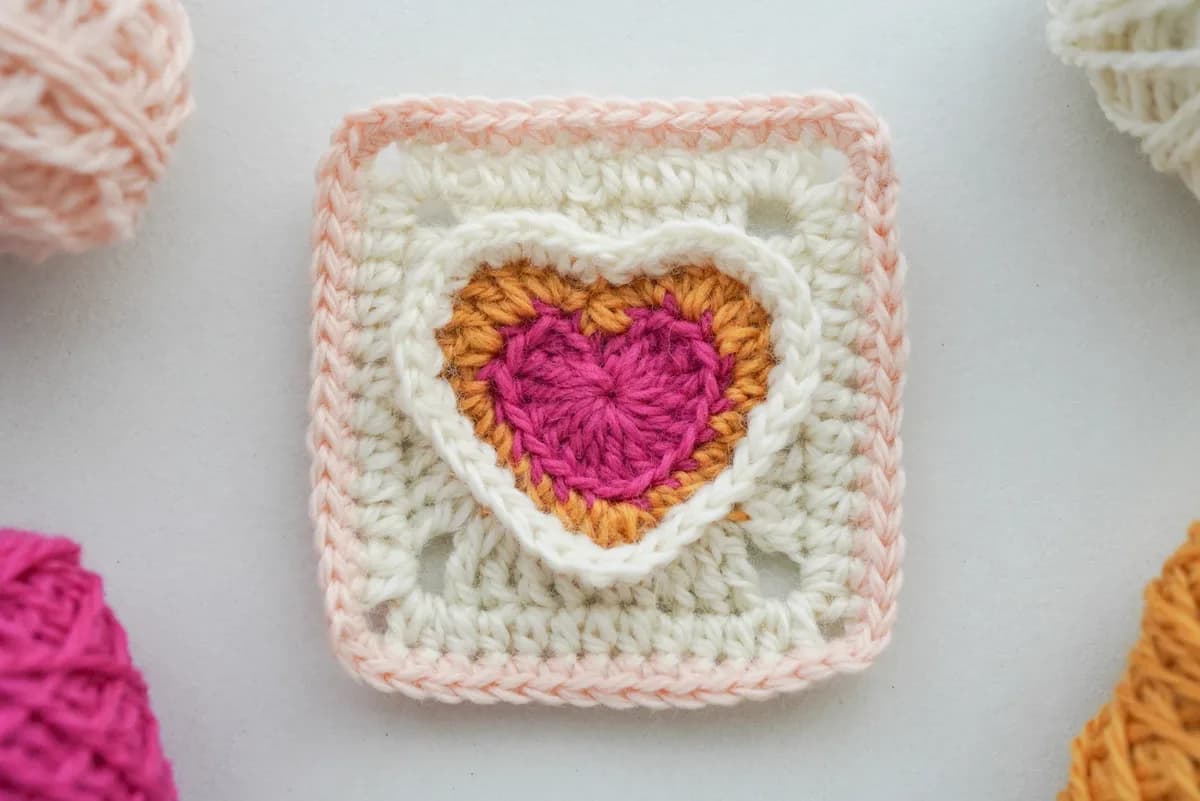
This textured Double Heart Granny Square begins with a small heart worked into a magic loop, then builds outward with a second raised heart, textured front- and back-loop rounds, and a square background. The alternating loop placement creates visible ridges that help the heart stand out from the sur
About this pattern
The Double Heart Granny Square is constructed in layers. The first round creates the innermost heart directly inside a magic loop using tall treble and double crochet stitches. Round 2 then builds a second heart around it while working through the back loops.
Round 3 uses the front loops to create another textured outline, while Round 4 returns to unused back loops from an earlier round to build the square background. This layered use of FLO and BLO is what gives the finished motif its raised, embossed appearance.
The later rounds are simpler. Round 5 adds an even half-double-crochet square around the motif, while Round 6 finishes the edge with single crochet.
The finished square measures approximately 3.2 inches when worked with DK or sport-weight yarn and a 3.00 mm hook. Its compact size makes it suitable for joining into blankets, cushion covers, decorative panels, coasters, and other small motif projects.
This textured Double Heart Granny Square begins with a small heart worked into a magic loop, then builds outward with a second raised heart, textured front- and back-loop rounds, and a square background. The alternating loop placement creates visible ridges that help the heart stand out from the surrounding fabric.
The pattern is best suited to intermediate crocheters who are comfortable with treble crochet, increases, decreases, front-loop-only and back-loop-only work, joining new yarn, and shaping a motif into a square. The finished square works well for blankets, cushions, coasters, decorative panels, and other motif-based projects.
Variations
Four-Color Version
Use a different color for the inner heart, outer heart, background, and border. Strong contrast between the first heart and the surrounding rounds makes the layered shape easier to see.
Two-Color Heart Square
Work both heart layers in one color and use a contrasting color for the square background and border. This creates a cleaner palette while keeping the textured construction visible.
Single-Color Textured Square
Work the entire motif in one color. Without contrasting colors, the design relies on the BLO and FLO ridges for definition, creating a more subtle embossed effect.
Larger Project
Join multiple finished squares together after blocking them to matching dimensions. The motif can be repeated for blankets, cushion covers, table pieces, or decorative wall panels.
Common mistakes
Tightening the Magic Loop Too Early
The center puckers and the two rounded lobes of the first heart may fold inward instead of spreading evenly.
Try this**How to fix it:** Keep the magic loop loose while working all of Round 1. Once every treble and double crochet is complete, pull the tail gradually while shaping the two lobes with your fingers.
Working the Hdc Decrease Into the Wrong Chains
The bottom of the heart may become wide or rounded instead of forming a defined V.
Try this**How to fix it:** Identify the second chain of the beginning ch 3 and the second chain of the ending ch 3 from Round 1. Work the hdc decrease specifically across those two chains.
Mixing Up FLO and BLO
One of the raised outline ridges disappears and the layered heart looks flatter.
Try this**How to fix it:** Check the required loop placement before beginning every textured round.
Miscounting the Increase Sections
One side of the heart may become larger than the other, or the motif may fail to lie flat.
Try this**How to fix it:** Use removable stitch markers between the increase groups and the long runs of plain stitches. Count each six-sc section separately before moving to the next increase group.
Joining New Yarn in the Wrong Location
The heart may appear rotated inside the background or the square shaping may become uneven.
Try this**How to fix it:** Follow the specified joining point for each round rather than attaching the yarn at the nearest convenient stitch. A locking stitch marker can be placed in important joining stitches before fastening off.
Materials & abbreviations
Materials
- DK or sport-weight yarn in 4 colors
- 3.00 mm crochet hook
- Darning or yarn needle
- Scissors
Abbreviations
- **ch**
- Chain
- **sc**
- Single crochet
- **hdc**
- Half double crochet
- **dc**
- Double crochet
- **tr**
- Treble crochet
- **sl st**
- Slip stitch
- **st**
- Stitch
- **sts**
- Stitches
- **sp**
- Space
- **inc**
- Increase
- **dec**
- Decrease
- **sk**
- Skip
- **BLO**
- Back loop only
- **FLO**
- Front loop only
Main pattern
Round 1 — First Heart
**Pattern:** Make a magic loop. Ch 3 as a standing stitch. Into the magic loop work: **3 tr, 4 dc, tr, 4 dc, 3 tr** Ch 3. Sl st into the original magic loop. Fasten off. **Step-by-step:** Begin with a loose magic loop so there is enough room to fit all of the tall stitches comfortably. Chain 3 as the starting stitch, then work the specified sequence directly into the center loop. The groups of treble and double crochet stitches create the two rounded upper lobes of the heart, while the single treble crochet in the middle helps establish the heart's shape. After the final three treble crochets, chain 3 and slip stitch back into the original loop. Do not pull the magic loop completely closed until all of the stitches are in place. Once the shape looks balanced, tighten the center gradually and fasten off.
Round 2 — Second Raised Heart
**Pattern:** Work this round in **BLO**. Join new yarn into the 3rd ch of the first ch 3 from Round 1. Ch as a standing stitch. In the same st work: **sc, hdc** Work: **2 dc inc** **hdc inc** **4 hdc** **hdc, dc, hdc in the next shaping position** **4 hdc** **hdc inc** **2 dc inc** **hdc, sc** Work an hdc dec over the 2nd chains of the beginning and ending ch-3 sections from Round 1. Join to the first st. Fasten off. **Pattern note:** The source says to "ch as a standing st" but does not specify the number of chains used at the beginning of this round. Verify the standing-chain length before publication. **Step-by-step:** Round 2 creates another shaped layer around the first heart and is worked through the back loops only. Join the new yarn into the third chain of the first ch-3 section from Round 1. The sequence uses a mixture of single crochet, half double crochet, double crochet increases, and a centered combination of hdc, dc, hdc to build the rounded sides of the second heart. At the bottom of the heart, the shaping is completed with an unusual half-double-crochet decrease. For this decrease, work across the **second chain of the beginning ch 3 and the second chain of the ending ch 3** from Round 1. This decrease pulls the lower section inward and helps form the pointed V at the base of the heart.
Round 3 — Front-Loop Texture Round
**Pattern:** Work this round in **FLO**. Join new yarn into the first sc from Round 2. Ch and sc in this st. Sc in the next st. Work: **5 sc inc** **6 sc** **sc inc** **6 sc** **5 sc inc** **2 sc** Sk 1 st. Join to the first sc. Fasten off. **Pattern note:** The source says "ch+sc" but does not specify the number of beginning chains. Verify the standing-chain instruction before publication. **Step-by-step:** This round is worked through the front loops only, which helps create another visible ridge around the heart. Join the yarn at the first single crochet from Round 2 and begin the round as directed. The increases are concentrated in groups around the curved portions of the heart. Between those increase sections are longer runs of plain single crochet. Count the groups carefully. The two sections of six regular single crochets are especially important for keeping both sides of the motif balanced. Near the end of the round, work two single crochets, skip one stitch, and join to the first single crochet.
Round 4 — Build the Square Background
**Pattern:** Work this entire round in the **BLO of Round 2 stitches**. Join new yarn into the first st of Round 2. Ch 3 as a standing st, counting as dc. Work: **hdc** **hdc inc** **ch 3** **dc inc** **hdc** **2 sc** **hdc** **dc** **dc inc** **ch 3** **tr inc** **dc** **3 hdc** **dc** **tr inc** **ch 3** **dc inc** **dc** **hdc** **2 sc** **hdc** **dc inc** **ch 3** **hdc inc** **hdc** **2 dc** Sl st to the top of the beginning ch 3. **Step-by-step:** Round 4 begins forming the background that will eventually turn the heart motif into a square. Instead of working into Round 3, return to the unused back loops of Round 2. This layered construction allows the textured heart to remain visible above the new background. The round uses a carefully arranged sequence of different stitch heights. Shorter stitches sit in flatter areas, while double and treble crochet increases add height where more fabric is needed. The four ch-3 spaces become the main corner spaces for the square. When the round is complete, join to the top of the beginning ch 3.
Round 5 — Complete the Square Shape
**Pattern:** Ch 2, counting as hdc. Hdc in the remaining sts around. In each corner sp work: **2 hdc, ch 2, 2 hdc** Continue working hdc in the remaining sts between corners. Sl st to the top of the beginning ch 2. Fasten off.
Round 6 — creates an even half-double-crochet round around the square background.
**Pattern:** The beginning ch 2 counts as the first hdc. Work one half double crochet in each regular stitch. When you reach a corner space, work two hdc, chain 2, and two more hdc into that same space. Repeat the same corner treatment at all four corners. The additional stitches and ch-2 space allow each corner to turn cleanly while keeping the sides straight.
Round 7 — Final Border
**Pattern:** Join new yarn in any corner sp. Ch to start. In each corner sp work: **sc, ch 1, sc** Sc in each remaining st around. Sl st to the top of the first sc. Fasten off. **Pattern note:** The source says only "ch to start" and does not specify the exact number of beginning chains. Verify this starting instruction before publication. **Step-by-step:** The last round adds a simple single-crochet border around the square. Begin in any corner space. Each corner receives a single crochet, one chain, and another single crochet in the same space. Work one single crochet into every stitch along the sides. Repeat the same corner sequence in all four corners. Join to the first single crochet and fasten off.
Finishing
Weave all loose yarn ends securely into the wrong side of the square.
Because every round includes a fasten-off or color change, leave enough yarn at each join to weave the tails securely through several nearby stitches.
Pay special attention to the magic-loop tail at the center. Secure it carefully so the heart center cannot loosen with use.
Gently block the finished square to approximately 3.2 × 3.2 inches. Shape all four corners evenly while preserving the raised heart ridges in the center.
Important notes
**Keep the magic loop loose while working Round 1.** — The tall treble and double crochet stitches need enough room to spread into the two heart lobes. Tightening the ring too early can cause the center to pucker.
**Place the Round 2 decrease carefully.** — The hdc decrease is worked specifically over the second chain of the beginning ch 3 and the second chain of the ending ch 3 from Round 1. Using different chains changes the point at the bottom of the heart.
**Keep track of FLO and BLO rounds.** — The texture depends on working through the correct loops. Accidentally working through both loops removes one of the intended raised ridges.
**Treat standing chains as stitches when instructed.** — When a beginning chain is described as a standing stitch or counted as a stitch, do not automatically add another stitch into the same position unless the pattern specifically tells you to do so.
**Count the long single-crochet sections carefully.** — Round 3 contains groups of increases separated by runs of six single crochets. Miscounting those plain sections can make one side of the heart longer than the other.
**Use firm, even tension.** — A 3.00 mm hook with DK or sport-weight yarn creates a firm fabric that helps the textured ridges remain clearly defined.
Frequently asked questions
It is best suited to intermediate crocheters. The individual stitches are common crochet stitches, but the pattern combines increases, a specialized decrease, FLO and BLO construction, multiple yarn joins, and shaped background rounds.
Working through only one loop leaves the unused loop visible on the surface. Those unused loops form raised ridges that help outline the heart and give the square its layered texture.
Check the hdc decrease in Round 2. It should be worked across the second chains of the beginning and ending ch-3 sections from Round 1. If the decrease is placed elsewhere, the base may not pull inward enough.
You can use a heavier yarn, but the finished square will be larger and thicker than the approximately 3.2-inch sample. Choose a hook appropriate for the yarn and make one test square before beginning a larger project.
The alternating FLO and BLO rounds create different tension across the motif. Gentle blocking helps straighten the sides, define the corners, and settle the textured heart into the center of the square.
You can weave them in as you go or after finishing the square. Because the pattern uses several color changes, weaving some ends during construction can make the final finishing easier.